
Since always, every time we have wanted to customize our equipment, the only operating system that offers us endless possibilities is Microsoft's Windows. Both on the Internet and in the application store itself, we have at our disposal a large number of applications to customize our copy of Windows.
However, if we look for applications of different themes, such as television series, movies, games, anime or any other theme, things get quite complicated, since it is very difficult to find these types of applications, if at some point they arrived to exist. If you want to customize your Windows 10 computer, the best we can do is do it through the icons. Here we show you how to convert an image into an icon.
Surely if we are followers of a specific theme, we would like to personalize our team not only with a wallpaper of that theme, but we may also like it customize each and every icon of the folders or applications that we usually use on our computer with certain images.
Windows allows us to use any image as an icon of a folder or application, as long as we have the necessary patience and resources to be able to carry out this process, since Although initially it is not complicated, it requires a series of processes and requirements that we cannot forget.
How to convert an image to an icon
First of all, we must bear in mind that if we want to obtain an excellent result and that the icon looks as if it had been made by a professional, the image in question, must be in PNG format and show the silhouette of the figure or character that we want to show without any background.
The PNG format offers us a transparent background, a background that when converted to an icon format, will show only the silhouette of the character or figure that we want to use as an icon of our team. If you don't want to complicate your life, the best thing we can do is do a Google search by adding PNG to the end of the search.
Once we have found the image in question we want to convert to an icon, it must convert the file to BMP format. This step is absolutely necessary to be able to use the image as if it were an icon to be processed later, since otherwise Windows will not be able to read it.
Once we have converted the PNG image to BMP format, we just have to change the file extension from .BMP to .ico. To change the file extension, we just have to click on the file name once to enable editing of the name. Or, we can select it with the mouse and press F2.
If the extension format is not shown, we must go to the top of the browser and check the box Show extensions. This option is natively disabled to prevent users from modifying certain aspects of the operating system without having the necessary knowledge to do so.
If we directly change the file from PNG to .ico, Windows will not be able to read the file format, and it will not show us the image we have created. This is because all the icons are created in BMP format, the only format compatible with the icons that Windows offers us.
How to change an application icon in Windows
If he thinks that the process to convert an image into an icon is complex, the process to change the icon of applications or folders for the icons that we have created is very simple and it does not require extensive knowledge of Windows.
- First of all, we must click on the application, file folder to which we want to replace the icon that it shows us natively.
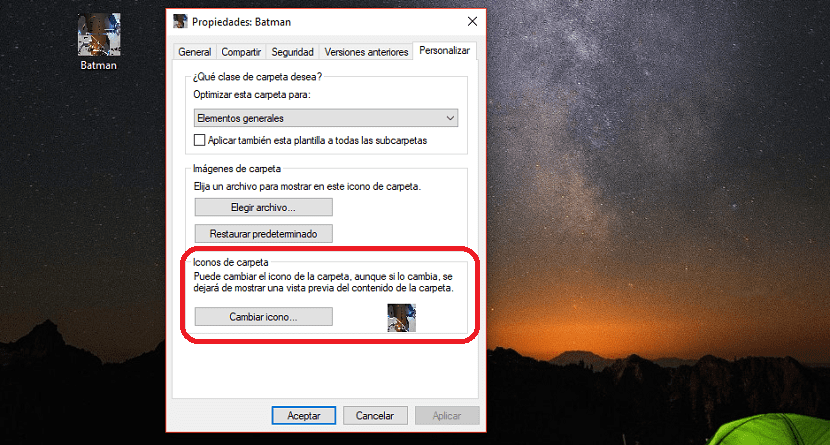
- Next, we place the mouse over the file, application or folder and press the right mouse button to access properties.
- Next, we click on the Customize tab and we go to Folder icons and click on Change icon. At that moment, we must find the file in .ico format that we want to use as an image and click on OK.
From that moment on, the icon of the application, folder or file, will show the image that we have converted into an icon, without affecting the operation of it.
How to resize desktop icons in Windows

Depending on the resolution of our equipment, it is likely that the final result will appear smaller than we could have imagined at first. Fortunately, Windows, within the infinite configuration options that it offers us, allows us to change their size.
The problem, depending on how you look at it, is that when performing this process, the size of all icons is also modified, so we can perform this process only on a specific icon. To change the size of the icons we must carry out the following steps:
- First, we must click on an area of the desktop where there are no icons.
- Next, within the pop-up menu that appears, click on View.
- In the drop-down menu we must select the size of the icon. By default, Windows 10 shows us the medium size, a size that we can change big or small.