
There are some programs that we use practically every day on our computer. Microsoft Word is one of them, essential in the daily life of millions of users. Either for work or studies, it is usual that we have to edit a document using this program. Thanks to it we have access to many functions, although there are usually some aspects that often present difficulty for many users when using it.
Creating indexes in Word is something that often presents problems for many users. Although it is something that we can do in a really simple way. Next we will tell you how we can create indexes in the document editor, for any occasion in which we need to use them.
Modify the format of titles
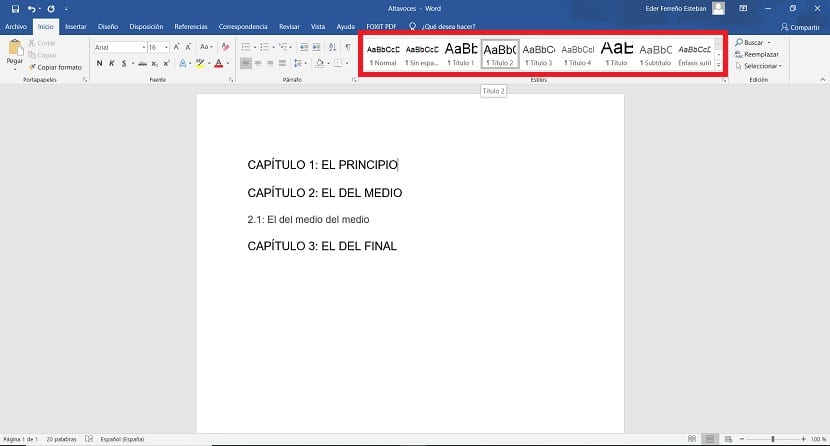
Before starting to create the index in a document in Word, it is important that we are using the correct format in the titles in it. The normal thing is that when we edit a document, we use titles for each of the sections and subsections that are in it. But it is also essential that we use the appropriate format, which we have in said document (Title 1, Title 2, etc). Since the index is based on this at the time of being created.
Therefore, if we already have these formats in use in the document, then the creation of said index will be very simple. Since the index will take these titles to create the levels and will be displayed directly on the screen. So we are not going to have to do anything else in this sense, really comfortable.
So it is good to go to this document in Word and use these formats in the titles that head each of the sections in it. The way to do it is really simple, as you can see in the photo. You just have to choose the title or level to use, for it to apply. Doing this will help us so that the index in question will be perfectly prepared when we create it, so it saves a lot of time in this regard. Once we have modified this we are ready to create said index.

Create an index in Word
When we have done these steps in the previous section, we are ready to begin with the creation of the index in Word. The steps to follow are very simple in this step. Before you start, it is important place the cursor at the beginning of the document. Since the index is created in the place where the cursor is, so we can make it by mistake entered in the middle of said document. Once we place the cursor at the beginning, we can start.
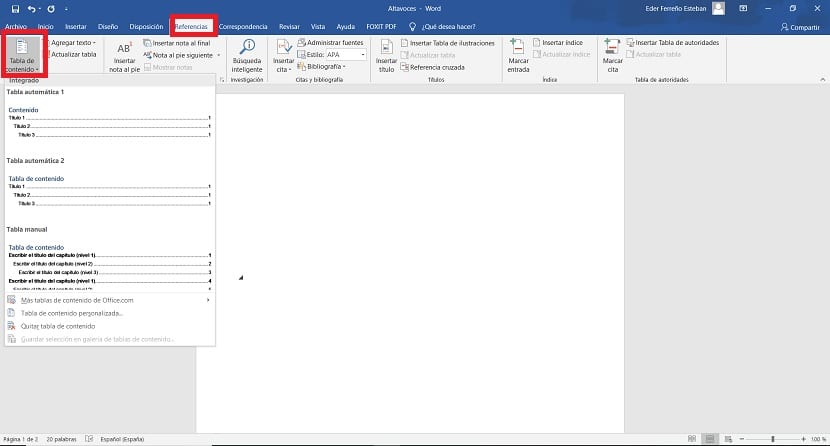
The first that we have to do is to click on the references section, located at the top of the document in Word. By clicking on it, the options in this section will be displayed. We look below at the left side of the screen, where we see an option called Table of Contents. Click on it, and a contextual menu will appear.
Then we will be able to see that a couple of index models come out, from which we can choose. We are only going to have to choose one of them, so that after a few seconds it will be shown in our Word document. By choosing it, you will see that the titles or sections that we have previously created are already shown in said index. So we don't have to add anything manually. Very comfortable in this regard. Furthermore, as we add new titles, they will be automatically incorporated into said index.
Therefore, all the changes that we introduce in this document, such as the page number in which a particular chapter begins, this change will be shown in that index. So everything will be fine in this regard. The normal thing in these cases is that this index is inserted in the document in Word at the end, when we're done editing, to make everything simpler in this sense. It also offers the possibility to edit it at the beginning. Each one must choose the option that seems most comfortable in each case.

Customize the index
Any index that we have created in a document in Word can be customized. A function is offered for them, so that each user will be able to customize it based on the document they have created. The way to enter this function is very simple, similar to the steps we have used to create it.
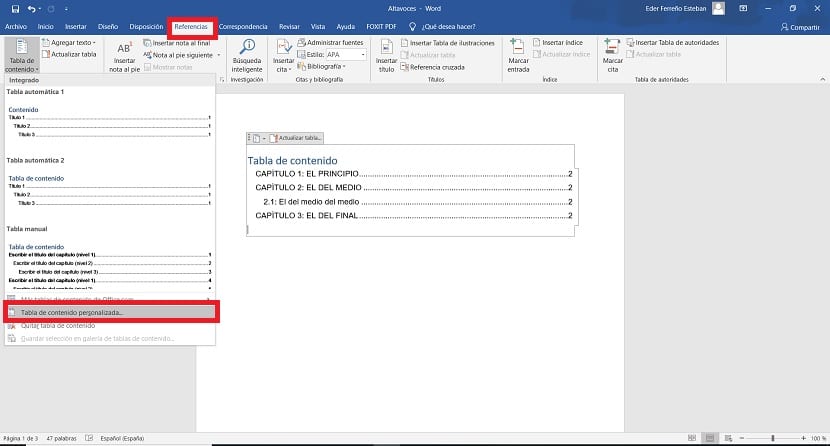
Therefore, we have to enter the references section at the top of the screen. Next, we click on the button for the table of contents, so that the contextual menu in that section is then displayed. Then we have to enter in the option called «Custom Table of Contents», which is located towards the end of that contextual menu. A new window then opens on the screen.
In this window we have a series of options with which to customize this index that we are going to use in Word. The options displayed in this window are:
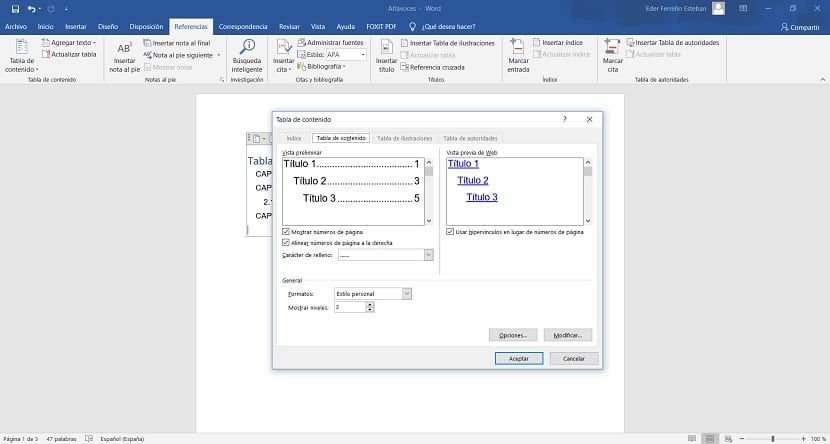
- Show page number: If we want this index to show the page where a chapter begins
- Use of hyperlinks: We can use hyperlinks in the index titles, so that clicking on one takes us to the page in question. It can be very useful, especially in documents that are quite long, it facilitates navigation.
- Formats: We can also choose the format we want to use in the index titles, there are several options from which to choose to be able to customize said index at all times.
- Show levels: It is possible to choose the amount of levels that we want to show in the index in Word. This is something that depends on the levels that we have used in those titles in the document. If we have used Title 1, 2, 3, 4, then we will need to use four levels. It must be adapted to the use of these titles.
Once the changes we want have been introduced, we can give you to accept and the index in question has been as we wanted. We can already print said document or send it by mail, or whatever we need to do with it. As you can see, creating an index in Word is not complicated.