One of the most important features that we could be using within Windows 7 (and later versions) is the well-known VHD disk image, something of which we had already mentioned previously in a series of articles.
The reader should be reminded of what the VHD disk image represents in an intrinsic way; this format is almost invisible when it comes to back up the entire system image, some of which can be done in Windows 7 and Windows 8.1 with their first update; As anecdotal as it may seem, the Windows 8 version does not have this feature, a factor that Microsoft later corrected. Now, you might be wondering what is this VHD disk image for? some of which we will describe later in this article.
Background on a VHD disk image in Windows 7
Right now we will try create a VHD disk image using Windows 7, although if the reader wishes, he can perform this same operation in Windows 8.1 as we had previously suggested. Regarding its possible uses, when creating a VHD disk image we would be manufacturing a virtual space within our operating system, which can be managed as a repository of temporary files. The image will always be present, acting as if it were an ordinary internal hard drive, which can be formatted and used as such. The space that we allocate will be housed in the place that we decide within the location of the hard drives present in the computer.
We had previously recommended the use of an application that creates a virtual disk, same that being commercial allowed us to use only a maximum of 4 GB in its free version, having to pay a fee for the professional license if we want to use more space.
It is there where the native tool proposed by Microsoft differs, since to create a VHD disk image the minimum space must be 3 MB onwards and almost unlimited, not having to pay something additional for this function since it comes installed by default to use it whenever we want.
How can we create a VHD disk image
Well, if we already have all the background that we mentioned above clear, now we will try to create a VHD disk image in Windows 7, having to follow the following steps:
- We click with the right mouse button on my PC.
- From the contextual menu we choose the option that says «Manage«.
- A new window will appear.
- From it we choose the option that says «Disk Management«.
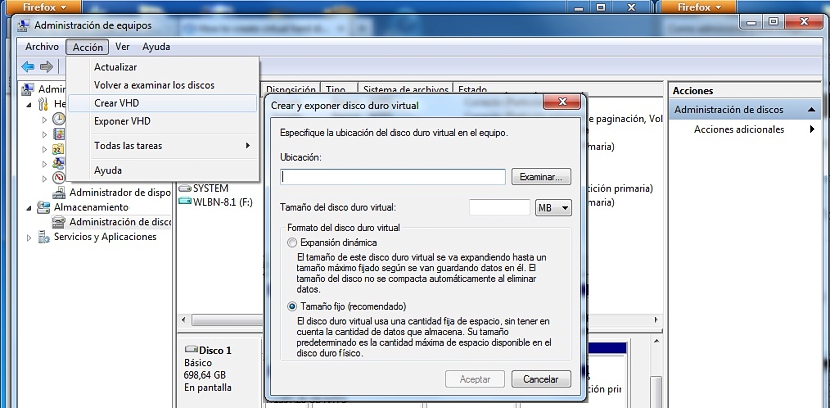
- We will go to the options menu at the top to choose «Action -> Create VHD«
- Now we will have to choose the place where this virtual image will be housed and the space that it will have.
That is all we need to do to create our first VHD disk image, which will appear later in the list of the Disk Manager, being able to format it if we wish.
How to delete a VHD disk image
Everything we suggested above will help us to have a virtual disk as part of our Windows 7 (or Windows 8.1) operating system; with this native tool that Microsoft offers us, We will not need to use any other from third-party developers. The biggest advantage is that this image will always be hosted in the place that we decide, which is why it would be convenient to place it on a secondary hard drive.
If we reinstall our operating system, this image will be safe and we can recover it by following the same steps we suggested above but choosing the option that says "Expose VHD" instead of "Create VHD".
Now, if we no longer want to have this virtual image, we will have to delete it so that it no longer occupies space within the hard drive where we have hosted it. To do this, we will only have to enter to the Disk Manager and later locate the site where it is located. We will identify her by a different color on the disk icon, which usually appears with a light blue tint.
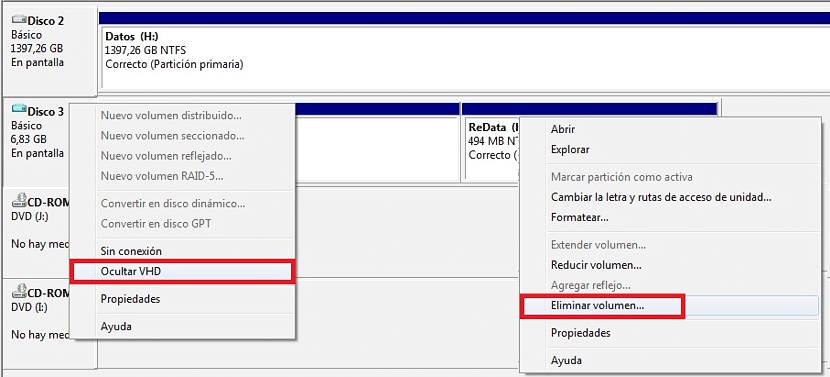
By right-clicking on this virtual hard disk, we can choose the option to "Hide VHD" or choose each of its partitions with the right button of the mouse, which will bring up the option that will allow us to «remove this unit«.