
Put a video as wallpaper on Windows 7 desktop? This could be one of the most difficult tasks to perform, although for those who have followed the history of the different operating systems proposed by Microsoft, this will not be a great novelty.
The fact is that in Windows Vista Microsoft came to place an interesting function that was liked by many people, same as by name DreamScene gave the possibility to place a video any as wallpaper on the desktop; unfortunately Microsoft decided to eliminate this feature from later versions, considering that it infringed the stability and functions of the operating system. Advantageously, there is a small tool that we can apply in Windows 7, which incredibly does not consume a large amount of system resources.
Download and run DreamScene Windows 7
DreamScene is a small tool that you can download from the following link, which luckily for many, it does not require to be installed but rather to be executed. This is because the tool is portable, which means that we can run it even from a USB stick. There are certain tricks that we must adopt in order to achieve our goal, something that we will mention below to avoid any type of damage to the operating system and confusion when playing a video on the Windows 7 desktop wallpaper.
Create a restore point in Windows 7
The tool called DreamScene is portable, which relies on certain instructions that will modify the Windows 7 Registry; for this reason, it is necessary to do an operating system restore point in case something comes to destabilize it; DreamScene can run it in both the Home version, the professional version and the Ultimate version according to its developer, although at the moment we cannot ensure that it works in Windows 8.1 because we have not been able to test the tool in that version.
Administrator permissions with DreamScene
The second thing to take into account is that DreamScene does not perform a simple "double click", since the changes that will be made in the "Windows 7 Registry" are reversible; for this reason, once you have unzipped the DreamScene executable you will have to select it with the right mouse button and run it with "administrator permissions". A small window will appear immediately, which has only 2 options to choose from, these being:
- Enable DreamScene
- DisableDreamScene

The first option will activate the feature, a small "flickering" (flashing) of the screen may be noticed. When you deactivate this feature with the other button, you will be able to admire the same effect, although any change made in the "Windows 7 Registry" will be restored to normal.
Play video with DreamScene enabled
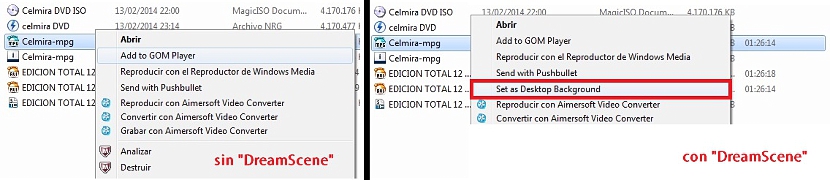
If you point the mouse pointer to some empty space on the Windows 7 desktop and right-click, you will notice that a new function has been integrated into the context menu, which refers to this DreamScene.
At the moment, DreamScene will appear without the possibility of being selected, having to adopt at this moment the little trick that we suggest below:
- You must open Windows Explorer.
- Go somewhere where you have a video in MPEG or AVI format.
- Select said video with the right mouse button.
- From the context menu, choose «Set as Desktop Background«.
After you've done the last step, you can immediately admire that the video will appear as the wallpaper on the Windows 7 desktop; If you have chosen a complete movie, it will play from beginning to end, although without the sound.

If you right-click on the desktop again (with the movie playing) you can admire that DreamScene allows you to pause the video. Without a doubt, this is an excellent feature that we could be having if at a certain moment we want to have an animation or video of any kind as a wallpaper in Windows 7.