
One of the tasks that Mac users can perform as well as Windows users at some point, ands formatting the hard drive to remove everything on the computer. In this case, what we are going to see is how to format a Mac, a task that is not complicated at all and that we can say is done relatively quickly.
This formatting a Mac computer may sound complicated seen from the eyes of someone who does not have much practice with computers, but in this case Apple makes it simple so that anyone can leave a totally clean Mac with just a few steps.
Why format a Mac?
There aren't really too many times when a Mac user has to format a Mac and they usually work quite well, so formatting is not usually necessary. Sometimes it is necessary and mandatory to format them, for example at the moment we have a problem important in the equipment that causes it to not work normally or in cases in which we have to sell the Mac and we don't want anything to be stored in it.

It is always important to make a backup beforehand
When we say always is always. And is that many users do not usually make regular backups of their computers (either Mac or PC) and any problem with the hard drive or similar can leave us in trouble. On the other hand, it is important to always have a backup copy of our data at hand to be able to use it on another computer. On Mac there is the option of automatic copies with Time Machine, a topic that we can leave for another time but that is really easy to make it work, since as the word says it is automatic and therefore it automatically makes backup copies every so often weather.
This can be configured from the Time Machine itself and we can store the copies directly on our Mac or on an external hard drive, that will depend on each one. Configuration can be done from the System Preferences> Time Machine.
The first thing we have to do to format the Mac
As we have said before, the backup with Time Machine or directly with any program / application that we want. Once we have the backup done, the steps to follow are really simple and we have to make sure that we have everything ready to start the deletion task. Now we have to see in what format we are going to erase the disk, there are several options: Mac OS Plus (Journaled), MS-DOS (FAT), and ExFAT.
Mac OS Plus (Journaled)
In this case, this format will be the one chosen whenever we have to reinstall macOS on your computer, something that we will almost certainly do, so this would be the recommended format. This is the native Apple format and therefore it will always be the first option for an internal disk of a Mac, of course, it must be clear that if we format it in Mac OS X Plus we will not be able to read or write on it on another computer.
exFAT
The ExFAT format is readable from Mac, Windows and Linux, but they will not be able to read or write it on other types of devices, such as mobile phones, consoles, televisions, etc. In this case it is used to transfer data from one computer to another but FAT is still a very good option for certain tasks, so this is your choice.
MS-DOS (FAT)
When we talk about MS-DOS (FAT) it can be said that it is the universal format in which most discs usually come outside the Apple environment. In Windows it is known as FAT32 and therefore we can say that a disk formatted in this system can be used to read and write in almost any OS, Windows, Linus, macOS or any mobile device, consoles, etc. The negative of this format is that only supports files up to 4GB in size and therefore to pass some files with more capacities we can have problems, problems that are solved simply by "splitting" the file into parts, but it is somewhat more uncomfortable.
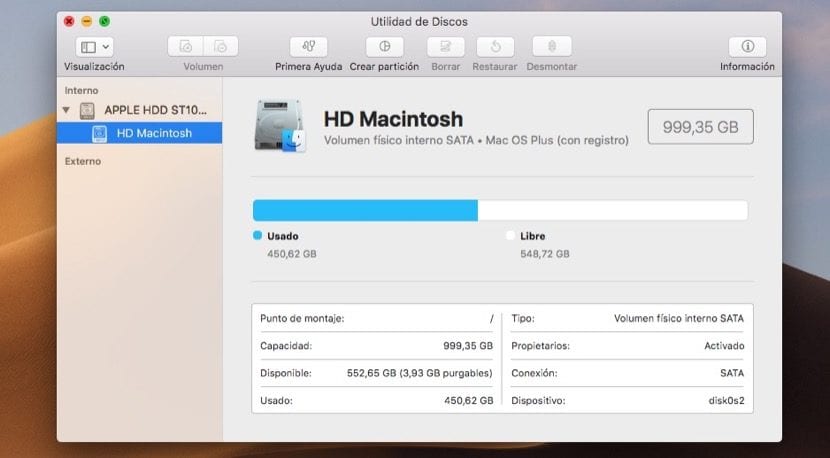
Considering the formats, we are left with Mac OS Plus (with registration) for formatting in the case of a clean installation or for those who want to sell the equipment. Once chosen we simply have to follow the steps to erase the Mac which are very simple. Do not run or be in a hurry to carry out this action as it can be a problem if you do not follow the steps in an orderly and calm way, so take the time you need for this task and do not take time.
The first is perform the backup and now we can move on to the next step.
- We open the Mac App Store on the Mac and download the macOS installer in its latest version.
- We can use tools such as "DiskmakerX" or "Install Disk Creator" to create an installer on an SD card or a Pendrive of at least 8GB
- In this case, what we are going to do is format directly so that the Mac is completely clean without using third-party tools.

For this we will use the tools that it offers us Apple with Terminal, a tool that seems complicated to use but is really simple and useful for this type of action in which we have to leave the Mac clean. So we continue with the steps:
- Download macOS High Sierra from the App Store and when it opens we close it using the command Cmd + Q
- We open the Finder> Applications and look for the macOS High Sierra installer that we just downloaded
- Right click on the icon and choose Show package content> Contents> Resources
- We open Terminal and write sudo followed by a space
- We return Show package contents> Contents> Resources and drag «createinstallmedia» from the installer to Terminal
- We wrote –Volume followed by a space and connect a USB or SD card to the computer
- We drag the volume from the USB to the Terminal and write –Applicationpath followed by a space
- From Finder> Applications we drag macOS High Sierra to Terminal and press Enter
- We press Y (Yes) and then Enter to confirm the action and the installation process will start instantly
Keep in mind that the USB or SD card will be completely clean (formatted) with this action, which ensures that it does not have documents or data that are important. The choice of USB type is also important as it will be storing the Mac OS, which it is better that we put aside those advertising pendrives or similar and use a good one for this task, its success may depend on it.
Now we have to wait for a reasonable time that can last between 15 or 30 min depending on the equipment and especially the USB used to create the installer, so be patient and let the Mac do the task. Once the process is finished we will restart the Mac from USB and to do this simply by pressing cmd + R when the computer starts up and we can already install macOS from the USB.

Remember that once the system is installed we do not have to follow the steps indicated to add the Apple ID, this will be left to the buyer of our Mac. Obviously if the Mac stays with us we do have to continue filling in the data and then synchronize the bookmarks, history, favorites, Apple Music contents, images, etc. that we had saved in the backup that we created previously.