In this part of Tutorial: Batch work with the Adobe suite, We will start the tutorial programming to automate the work.
Schedule an Action is Photoshop It is easy, however, the question may arise for renting: what is a Share?
One Share in Photoshop It is a set of preset and programmed commands to be executed. Suppose we have to treat 150 photos the same. Well in Photoshop We have the option of being able to record the command line to be executed and repeat it with the press of a button, since we can program them to be executed by pressing the function keys.
As we explained in the previous part, in Tutorial: Tutorial: Batch work with the Adobe suite (3rd Part) before developing an Action, it is necessary to know what you want to do, and carefully prepare the previous steps, so as not to have problems later. To do this, we prepare, among other things, a paper where we write down the treatments that we did to the photo and in what order.
The Actions window
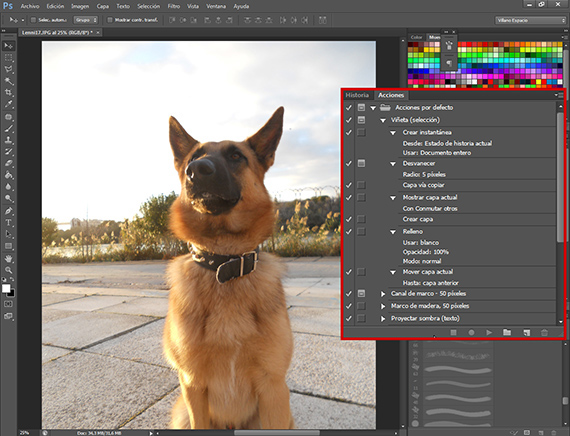
To get to the actions window we just have to go to the route Window-Actions, and from there access. The Actions window is normally associated with the History window. Once we have located it, we will see how it has a folder named Actions by default. Inside that folder if we open it we will find several Actions that it brings by default Photoshop CS6 and that serve as a sample of what an Action can be. If we look we will see a triangle that is pointing to the right, next to the name of the Action, and if we press it we will be able to see all the commands that this Action executes to achieve its objective. Next to that command, another triangle appears that if we press it, it will tell us what values that command uses within the Action that executes it. At the bottom edge of the Actions window we find several options, which are the ones we will work with.
Starting to create the Action
At the bottom of the Actions window, we will see several symbols that I will explain starting from the right:
- Delete: It is used to delete an Action or a command within an Action.
- Create new Action: Create a new Action within the group of Actions you choose.
- Create new group: Create a new group where to put your Actions.
- Execute Selection: Plays the selected Action.
- Start Recording: Starts the process of recording an Action.
- Stop: Stops a recording or the execution of an Action.
With these commands we are going to program an Action that will then allow us to execute several photos per batch.To access more options in the Actions window, we go to the upper right part of the Actions window box and we will see a symbol that is 3 horizontal lines and a triangle pointing down to the side. We click on the arrow and access more options in the Actions window. We find a first option, the button mode, which serves to simplify the process of playing the Action, turning the window into a panel of digital buttons that you just have to click on to make it play. It also has the same options mentioned before and some more that I recommend that you investigate on your own, since they will be very useful once you have explained the process. Once the review is done, we are going to start the Action.
Pre-programming
Before starting to program the Action, let's prepare the paper with the commands and values that we are going to insert into the Action. We must know that these commands will be the ones that give its final image to the whole of the work. Once we have them decided and prepared, we start recording.

Recording
To start recording, first we are going to create a new group of actions, which we will call Creatives Online.
Within that group of Actions we will create a new Action. We click on Create new Action and a dialog box will open where we can choose several options, including choosing a color, which will be used for the button mode, or the option (tremendously useful) of associating one of the functionality keys to an Action , which we can also associate with a combination of it with Ctrl or Shift.

Once we have given the record button that offers us the option, we will go on to program it with the commands and values that we had pointed out before, in the order indicated. To program them, we only have to execute the command, that is, to program in the Action the command Intensity, We just have to run the tool, without forgetting to apply the values we have set and it will be recorded automatically.AL the end, in order for it to work correctly, we will place the command Save as. When we have finished executing all the commands, we will click on the Stop option and we have our action recorded and ready to be used whenever we want.
In the next part of the tutorial, we will see some Recording options that Actions have, as well as we will start working with it. work per batch.
More information - Tutorial: Tutorial: Batch work with the Adobe suite (3rd Part)