
All the 3D printers are booming. It is an obvious fact that this type of device has marked a before and after in the world. We have already told you about its many uses, some really interesting, so it is clear that 3D printers have come to stay.
Now, it's time to test a 3D printer of this type for the first time. enterD He has left us one of his 3D printers, the 3D UP Plus2 model. For me it is quite a challenge since until now I have only looked at the world of 3D creation with curious eyes from a relative safety distance. For all those who, like me, are not yet very informed, we will start with an explanation of the most important concepts before getting to the UP Plus3 2D printer review.
What is a 3D printer?
Una 3D printer is a computer that allows us to create objects in 3 dimensions from digital models.
Printing is done by superposition of infinite layers of a suitable material for this function. It's like making a sandwich where all the layers are sliced bread!
FDM vs. DLP
Depending on the way in which these layers are deposited, we distinguish several printing techniques, mainly 2 in the home printing environment:
FDM: A layer of a molten material is deposited, when it cools it solidifies and allows adding a new layer of material on top of the current one.
SLA: A photosensitive resin is exposed to a light source that solidifies a layer of material. This layer moves and hits the light source again, solidifying a new layer joined to the previous one. Each layer will have the shape of the beam of light with which we have illuminated.
Layer resolution or Z resolution
The thinner the layers, the more resolution we will have. Currently, consumer printers are around 50 microns (0.05 millimeters), which allows printing detailed objects but with a certain roughness to the touch and sight.
Printing times on a 3D printer
The printing times of an object vary depending on the resolution at which they are printed. Higher resolution implies a greater number of layers of material, each layer is thinner and more quantity must be deposited to achieve the desired height. To print a 5cm object (both high and wide) we can spend 30 minutes printing using lower resolutions such as spending hours with more detailed resolutions.
Support structures
Let's imagine that we are going to print a letter T. That a printed object has a very different shape between layers implies that the printer is going to make a layer suspended in the air. In the case of the T when you start to print the top stick.
To make the printer work easier From the first layer to the conflict layer, additional structures will be printed to facilitate the printing work. Once we have the printed object we will remove them
Printing area
Just as the ink printer in our house cannot print beyond the A4 size sheets, the size of the printed objects will depend on the size of our printer. The most common values are around 15-20 cm for each of its sides (width lenght and tall)
ABS vs PLA materials
FDM printers work with spools of filament. This is introduced little by little in the printer, melts and deposits in the successive layers of our object. There are countless coils of different types of materials, the most common being ABS (like the handle of a suitcase) and PLA (biodegradable and of natural origin)
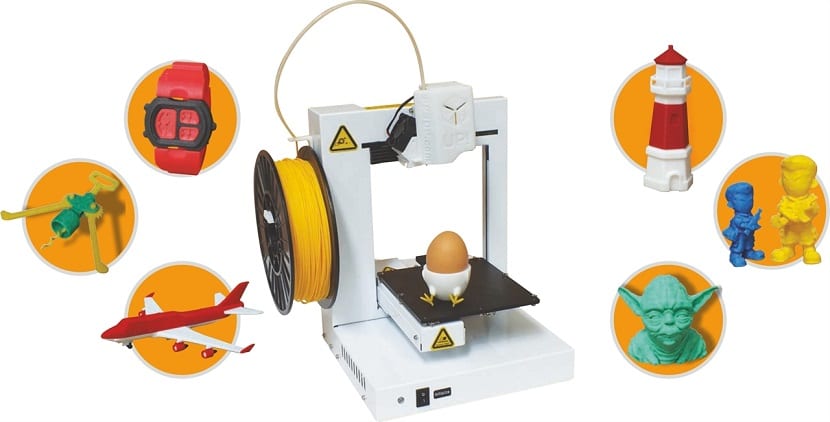
What can we print with a 3D printer
Practically everything you can think of, We live in a world surrounded by plastic due to the versatility of this material: self-watering pots, the battery cover on the remote that broke last week. an ergonomic handle to keep our fingers off when we take the groceries home, a whistle, buckles, protective covers for the mobile, mounts for the camera ...
Libraries and repositories to print 3D objects
Although it is not difficult to model objects, there are many people who do not want to spend time on it and prefer to print objects published freely and at no cost in repositories ordered by categories. Attention that here I link a few repositories to be able to print the 3D objects that you like the most.
Thingiverse
Yeggy
mynifactory
you imagine
pinshape
Design software
One could spend a week talking about the different free and paid software in the world of 3D design. I'm only going to name 3, very easy to use:
- Tinkercad: Free online program that is based on the union of simple geometric figures.
- onshape: Also online, but something more complex. Very limited for free users but with infinite options in paid accounts.
- 3DBuilder: Surprise, Microsoft has added in Windows 10 a very powerful application for designing 3D objects. Essential to take a look.
- meshmixer. Developed by Autodesk, this software incorporates a wide range of tools for creating 3D objects. From the union of simple polygons, through digital modeling and even maya editing. And all in free software.
Printing software

Once we have a 3D object we need printing software to separate it into printable layers and is in charge of controlling the printer so that it makes a faithful impression to the object in question.
In this case, the supplied printer has its own software, which is also responsible for supervising the entire printing process and performing all printer-related tasks. Ok, if you have read all this you can already act as "technological brothers-in-law" and entertain the family for a while at the next celebration. Now, let's start with the analysis.
Who is EntresD?
Despite the fact that expensive equipment that allowed 3D prototypes had been existed for many years, there has not been a real revolution until recently cheaper FDM printers and the appearance of Open Source models.
This is where it comes in EntresD, distributor in Spain and Portugal of the UP3D printer range of the Chinese company “Beijing Tiertime Technology Co”, A company with more than 20 years of experience in the industrial 3D printing sector.
Meanwhile enterDWith only 4 years of experience since its foundation, it has managed to gain a foothold in the Spanish market for "low-cost 3D printing" and to achieve great recognition thanks to the quality of its solutions. And I anticipate that the UP Plus3 2D printer is a clear example of this.
Starting the UP Plus3 2D Printer Review
The model that they have lent me for the analysis is the UP Plus3 2D printer. The manufacturer says that this printer, with only 5 kilos of weight and very contained measures, we allows printing 14x14x13 cm objects, slightly smaller than the usual size, with a layer resolution of between 15 and 40 microns.
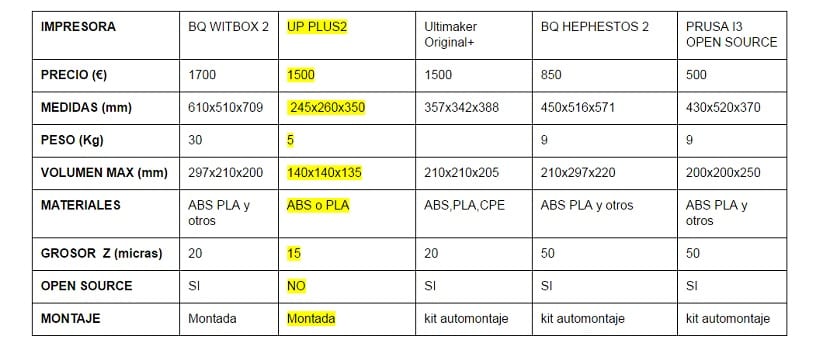
In the comparison table below we will compare it with some of the alternatives on the market.
Customer support
At no time did I need to contact the technical service, since the most common problems are perfectly solved between the youtube videos, the forum and the EntresD FAQ.
In my case I have had 2 problems.
- The extruder has clogged but I have solved it perfectly following the steps of the video posted by the manufacturer.
- Warping problems on large surface objects. Here I have suffered a little more to solve them.
For more serious problems that cannot be solved at home or doubts that require direct attention, the company has a telephone number and an email service available to customers. I have been able to find out that The technical and after-sales service is subcontracted to Rexion, a company with extensive experience in the sector, so in that aspect you will have excellent coverage.
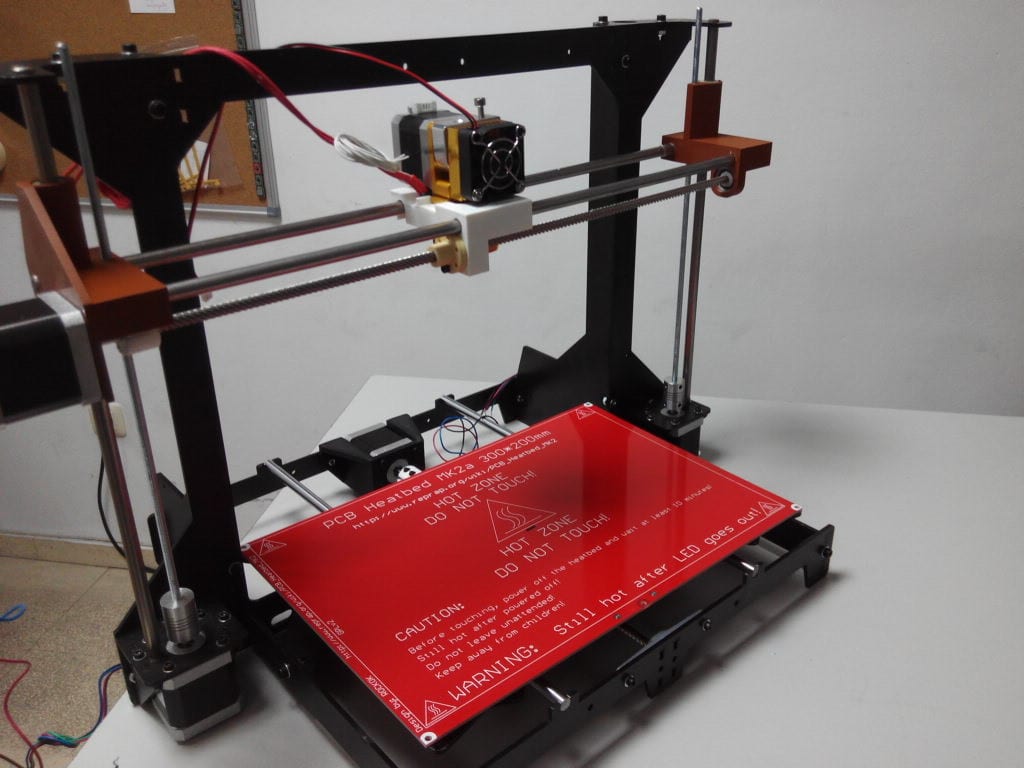
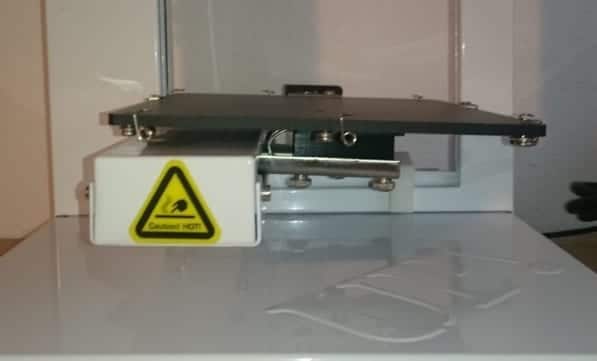
Notable printer components
- Power supply and electronics: With a very successful design, the printer integrates them and hides them in the base.
- Extruder and fan: The detail of printing the printer's own plastic parts and leaving the designs accessible so that we can print and replace those parts that deteriorate over time is curious.
- Filament coil: 700 gr or 1000 gr reels can be used.
- Print base: A spring system holds the build platform on the platform. A simple solution to change the base between printing and printing.
- X, Y and Z motors: The motors that are in charge of raising and moving the printing platform are hidden in the body of the printer itself.
- Self-leveling system: Based on a pressure sensor.
Unboxing UP Plus3 2D printer
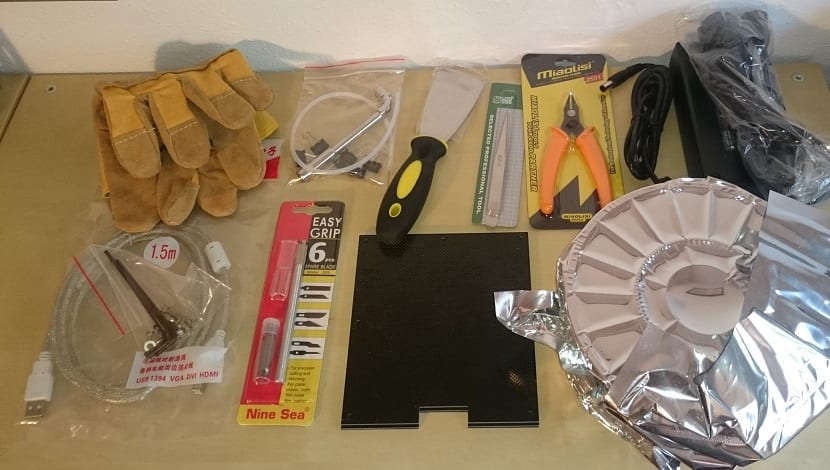
The printer comes with many add-ons:
- Gloves: it must be taken into account that the extruder is heated to 260º C and the base on which it is printed at 60ºC.
- Spatula: remember that the pieces, in most cases, stick very well to the base, so without it it would be impossible to detach them without breaking.
- Cutting nippers, tweezers and precision blade: Very useful for removing the support structures of the pieces without damaging them.
- A 700 gram spool of Premium white ABS filament: Vacuum packed to prevent material from being damaged by moisture.
- 3 printer bases: as removing a piece from the printer base takes time, the manufacturer has included 3. while you peel and clean one you print on another.
- Key to disassemble the extruder: simply a key used to disassemble the extruder from the 3D printer
- Power supply and USB cable: long enough to place the printer comfortably next to the PC.
Time to first print
From the moment we take the printer out of the box, calibrate it, install the software on a Windows PC and download a design from an online library, the theoretical time has to be very short. Printers are calibrated at the factory.
However, the tested model is a test unit that has been passed by other colleagues, so the printing base was very out of adjustment. There is an ingenious 3-screw system to level the base. In ten minutes the base was completely level. It only remains to calibrate the height of the base with respect to the extruder and millimetric leveling of the base (this adjustment has to be very fine and cannot be done with the aforementioned screws
One of the most important additions to this model is the inclusion of a calibration kit. It took me only 2 minutes to do it.Out of curiosity, I have tried to do a manual calibration, I was measuring late and it was still not perfect. Advice: DON'T COME NEAR A 3D PRINTER WITHOUT AUTOCALIBRATION.
Installing the UP Plus3 2D printer software in Windows 10 has not given any problem and I have been able to make several prints in a row without any problem. The learning curve is very simple, and the difficulties appear when you want to start making your own designs.
First impressions of Objects

In the photos below you can see the support structures that we mentioned at the beginning of the article. The EntresD software adds them automatically, we just have to choose the object to print and it does the rest. The trade-off is that, to make sure there will be no problems, add more structures than necessary. The material used for this is negligible, however by modifying the default options of the software we can eliminate or reduce these structures.
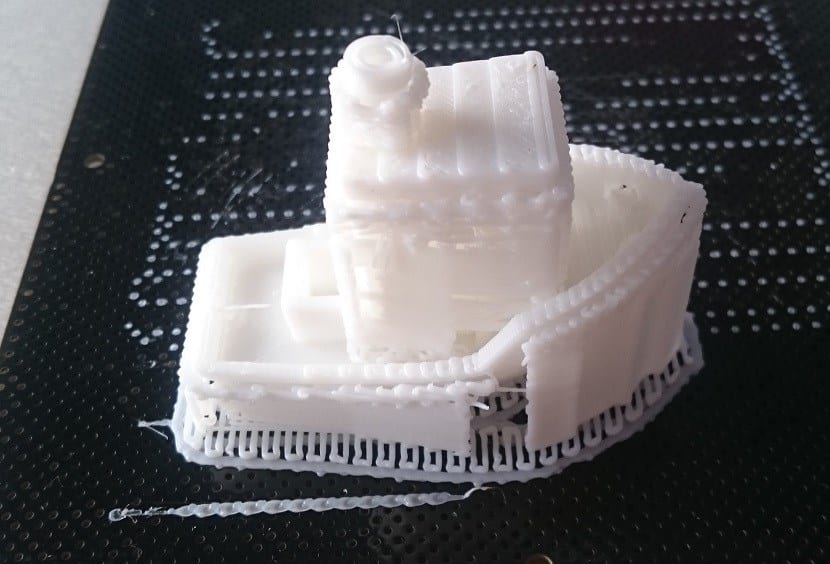
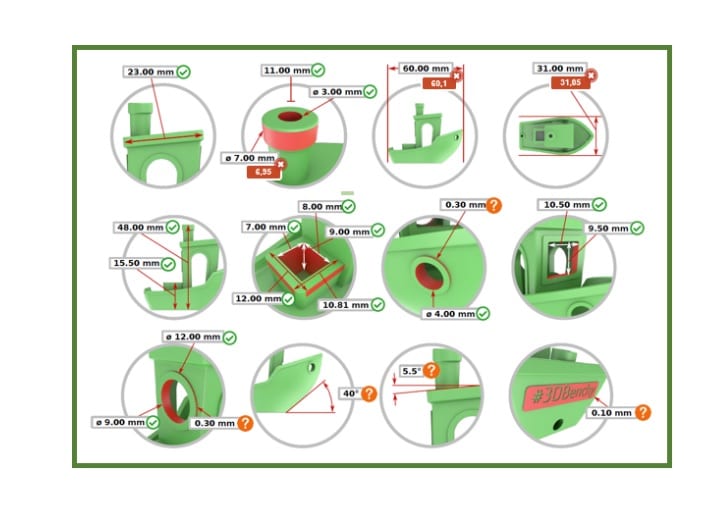
I have printed this object because, in addition to being a very nice boat, It was explicitly created to test the print quality of the different printers on the market.
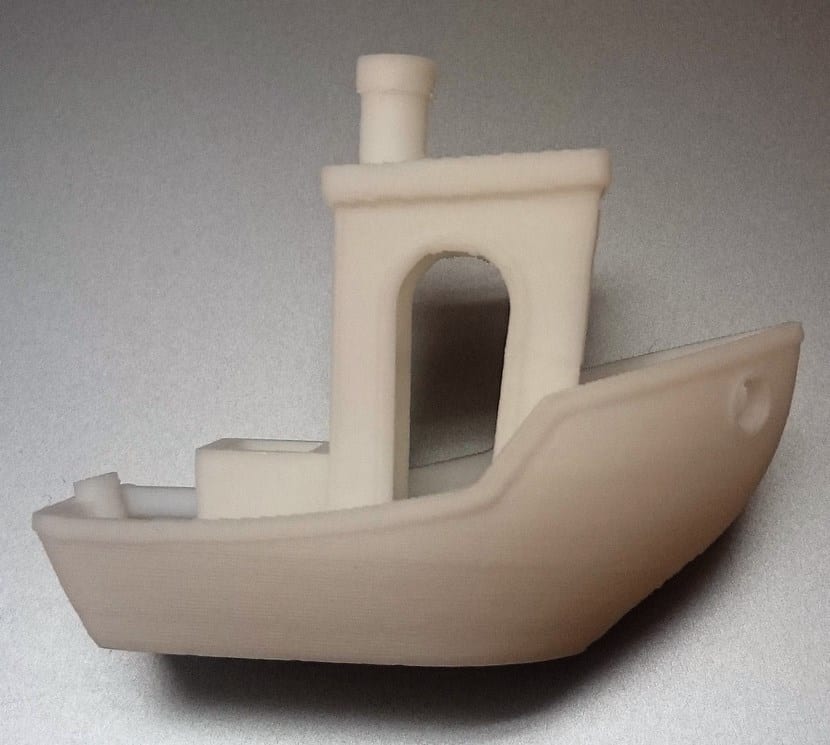
I have printed the part at maximum resolution (15 microns) and compared the real values with the theoretical ones using a caliper. The measurements that I have not been able to make have been marked with a question mark.
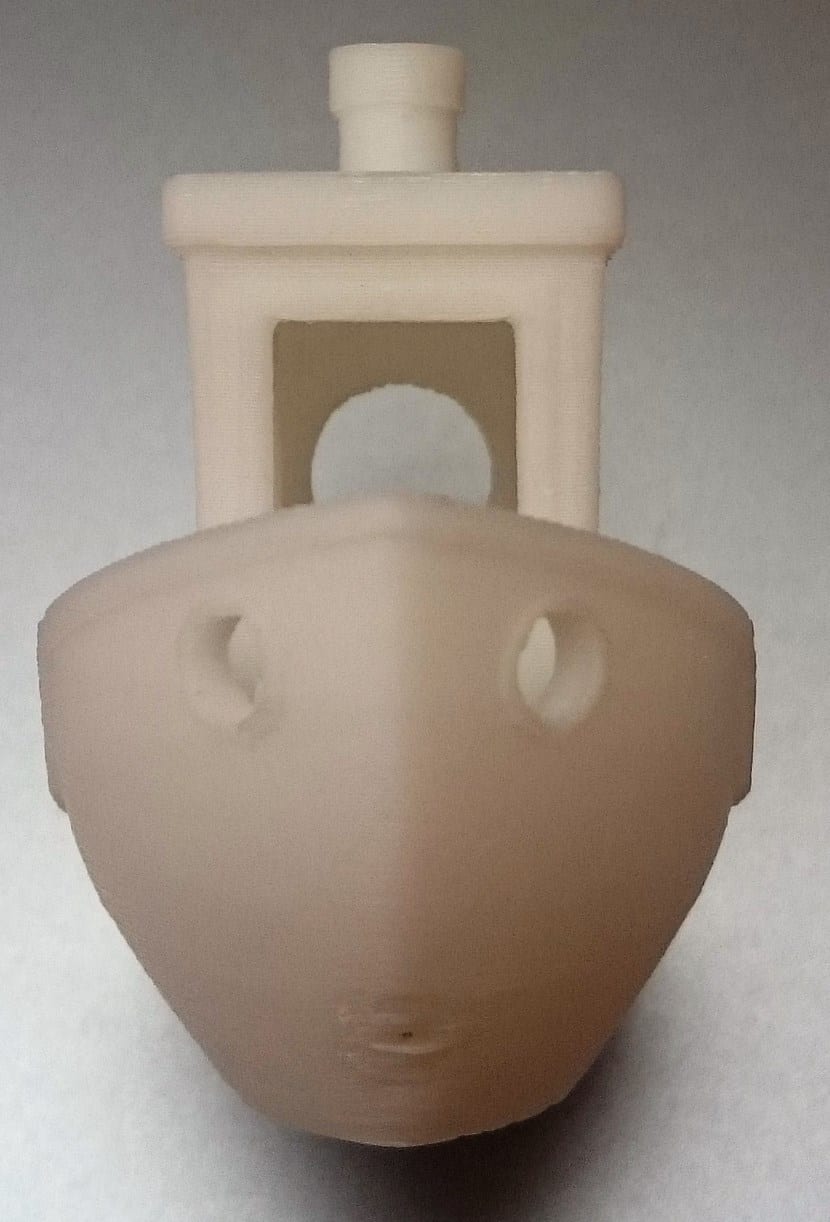
La printed piece is very accurate. Errors are limited to 100 microns to the total length of the piece and 50 microns to the width. In the impression of a boss also adds 50 microns.
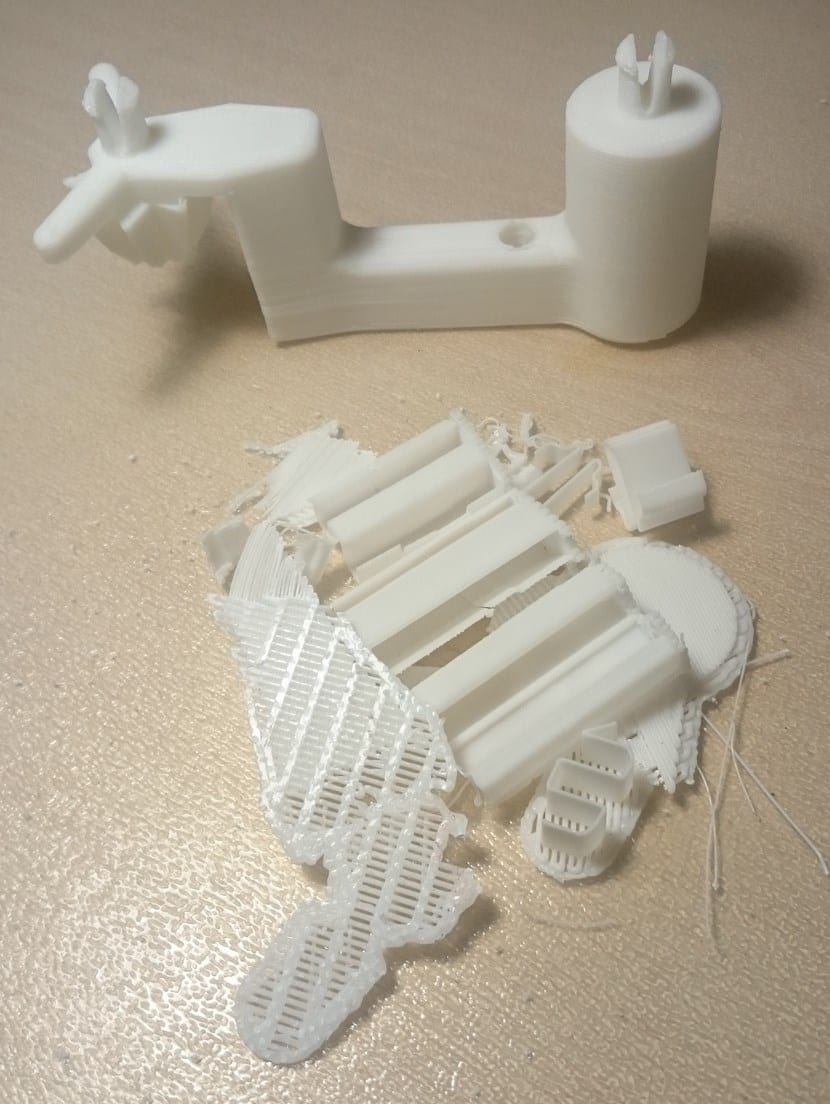
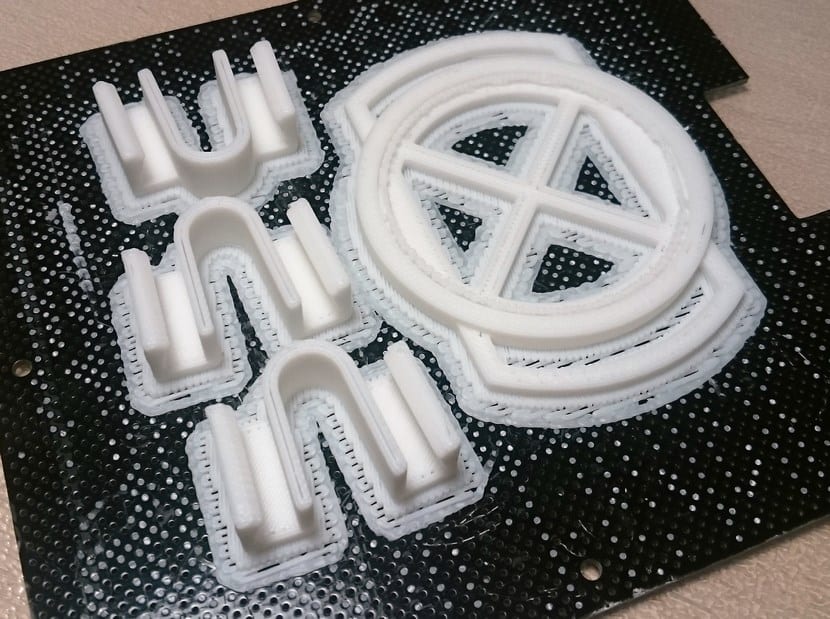
Discarded support material

The following images show a piece printed with supports and the same piece already cleaned next to all removed support material.
Print part in various resolutions
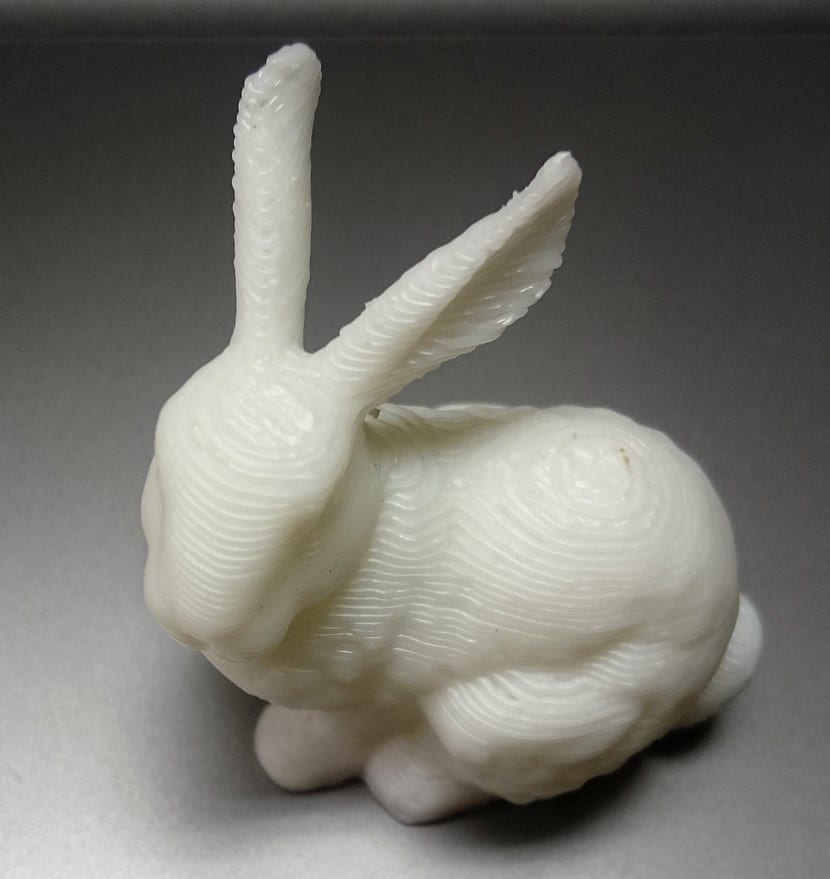
Without being able to see parts in your hand, it is very difficult to distinguish the differences between maximum and minimum resolution. But it is very important because the Being able to print a figure at 15 microns is what makes a printer more complex and at the same time more expensive.
The bunny has been printed at 50 microns in which the thickness of each layer can be seen with the naked eye. Instead, the boat has been printed at 15 microns. Important at this point to remember that most 3D printers for this market sector cannot print at less than 100 microns, something that leaves the UP Plus3 2D printer in a very good place.
Highly detailed part printing
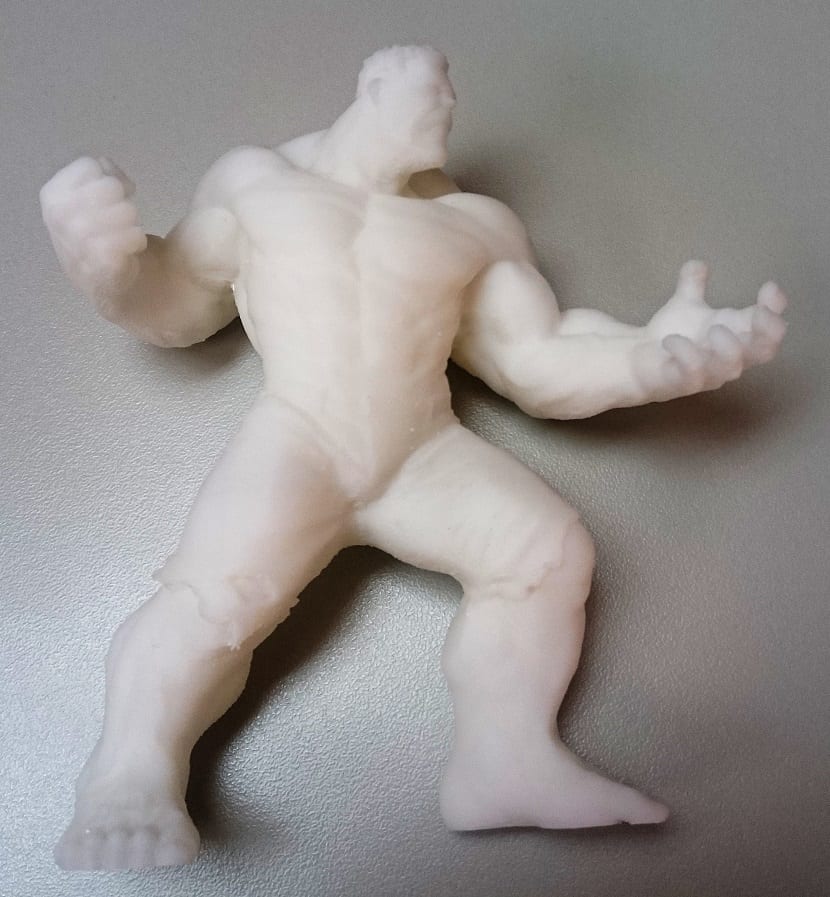
Now that I've gotten my hands on the printer's controls, let's make the most of its potential. For this I have printed a Hulk figure 10 cm high. La Printing is spectacular, only some irregularities are appreciated in the areas that require an almost horizontal printing on support.
Media yield and print times

For 3D print of the Hulk figure At maximum resolution, measuring 9x4x10 cm, I only needed 40 grams of ABS plastic, including the disposable supports for the correct printing. The performance of a single coil of material is extremely high.
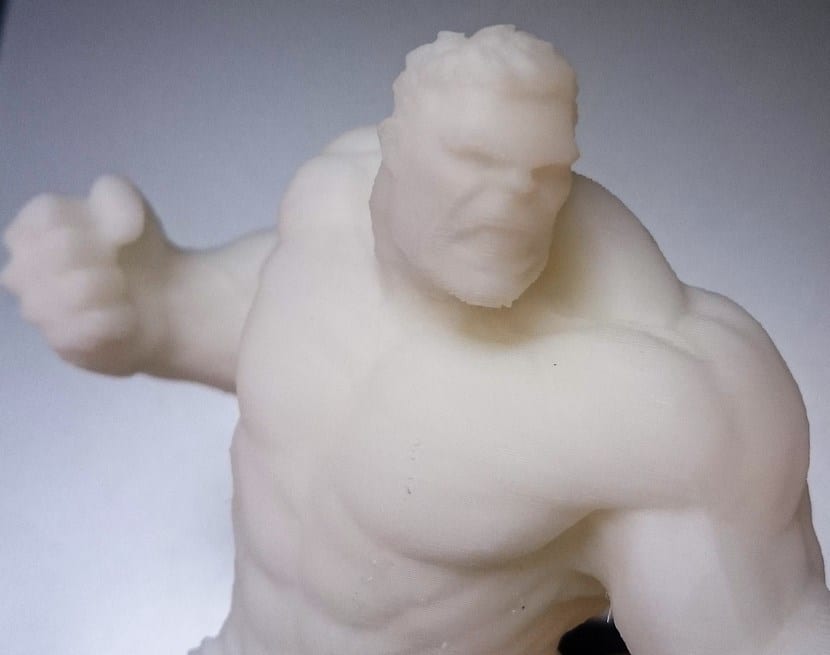
Howeveror it took the printer 7 hours to finish printing the partThis is a long but reasonable time if we take into account that almost 700 layers of material have been needed for its realization.
Parts with warping problems
Warping is a widespread problem in 3D printers which originates when consecutive layers of material are cooled at different speeds, this causes the material to deform and warp. Occurs when parts with a large flat surface are printed.
The model analyzed, being an open printer, is more sensitive to differences in ambient temperature. The manufacturer on his blog has a article explaining in detail the reason why these problems occur and some tricks to solve them. If the printer had an external box, this problem would be significantly reduced.
Simultaneous printing of several pieces
It is possible to print several parts at the same resolution simultaneously since the printer in each layer is able to pass from piece to piece without leaving traces of material. It is common for some printers when printing several objects at the same time to make fine threads of excess material between the pieces
Maximum printable object size
I have tried to print an object of the maximum size indicated by the manufacturer, but I have not been able to do it correctly, the support structures that it automatically adds have increased the printing area causing the total surface to be printed to be greater than the printing area. further the printable area is slightly reduced with the supports used to hold the plates on which it is printed, so I recommend using a slightly smaller printable area than that recommended by the manufacturer.
Consumables compatibility
EntresD recommends the use of the consumables that it has for sale claiming that they follow very rigorous quality controls. This does not mean that it prohibits the use of consumables from third-party brands, a detail to be appreciated. For comparison, the difference between the manufacturer's consumables and the cheapest that we have been able to find in an online search is 30%. Taking into account the performance that we obtain from each coil, I would not risk it and opt for the original solutions, but that is already up to each one.
Points to improve
Finally, I want to highlight the points that I consider the most negative after analyzing the UP PLUS3 2D printer for three weeks.
- Print and control the printer from Android and wirelessly It is the pending subject of the majority of manufacturers of 3D printers. Hopefully as soon as possible enterD pay special attention to this need.
- La micro-perforated plate used for printing and the way it is attached to the printer dock even though it does its job, not as practical as i would like. Effort is required to clean these plates between impressions.
- The printing software does the job, but it's only in English.
- It seems that the manufacturer has preferred to reduce the printing area to be able to make a team with very contained measurements. But this has partly limited the possibility of printing some everyday objects in a domestic environment, such as flower pots or lamps.
Final conclusions
The analyzed printer has more than met the expectations I had of her. Without having any prior knowledge, I have been able to enter the world of 3D printing without difficulty. The model provided by enterD It is a very reliable model, robust to the abuses of inexperience and that has printed perfectly from the first centimeter to the last of the premium ABS filament coil.
The dimensions of the equipment allow us to make a hole in most of our houses without problems. Although it is true that there are countless Kits on the market with all the components to assemble a 3D printer, the quality of the finishes of the 3DUP Plus2 and customer support guarantee us not to have problems that rob us of too many hours of our free time.
The manufacturer's own website tells us that this model is intended for companies that must make prototypes of parts and objects. Given all the above, I can not say more than the UP Plus3 2D printer has left a very good taste in my mouth and that I will closely follow the launch in September of new model with which they want to revolutionize home printing.
Editor's opinion
- Editor's rating
- 4 star rating
- Excellent
- UP Plus3 2D Printer
- Review of: alfonso de fruits
- Posted on:
- Last modification:
- Integrated
- Performance
- Portability (size / weight)
- Price quality
Points in favor
Pros
- Very compact size, the printer fits anywhere
- Very easy to install printer
- Unbeatable value for money, offering professional results
Points against
Cons
- Since the printer base is open, parts with a very large base suffer a lot of warping.
- Not compatible with all filaments available on the market
excellent demonstration…. I would like to make an inquiry… .. I want to make stamps in plastisol or some soft material that can be used for printing, such as rubber stamps. Atte.
marcoalmirall@hotmail.com