
Windows 8.1 like other Microsoft operating systems offers the possibility for its users to place a photograph on their profile. It will appear every time a session is started and before the user enters the access password.
Despite the fact that this task can be carried out in all Microsoft operating systems, only in Windows 8.1 all the images that we have used at any given time to identify ourselves in the account, they will be registered within the modern interface in the configuration; Although this does not involve a big problem, but every time we enter that area we will notice the presence of these images, which we may no longer want to see or use at any time. Today's tutorial has the intention of being able to locate the place where these images are to be able to eliminate them in a single step.
Find the images used in the Windows 8.1 account
In the first instance, we want to point the reader to the place where these images are located within the Windows 8.1 configuration, so that he can corroborate and have a better idea of what we are trying to suggest for now. To be able to arrive towards this place we have to make use of the Charms bar and thus, make the respective options to be displayed that will help us to enter the PC configuration.
If for any reason you can't activate the Charms bar By placing the mouse pointer towards the top right of the screen, this means that the operating system files were damaged and therefore require a special process to be recovered. If you don't know how to perform this task, we recommend that you review the article that we wrote previously, where we made known the two alternatives that exist to be able to retrieve all the bars that appear when we move the mouse pointer to any of the corners.
If we already have access to the Charms bar then we must follow the following steps:
- Bring the mouse pointer to the upper right corner of the screen.
- From the options shown choose the one that says «setting»At the bottom of this Charms bar.
- Then choose the option «change PC settings»That will be displayed in the new window and at the bottom of it.
- Now we must go towards the option of «accounts»In the new window in which we are.
With the steps we suggested above, we will be directly in our account area in Windows 8.1; right here we will have the opportunity to admire all those images that at a certain moment we choose so that they are part of our profile. The current one will be in the central part while the old ones, to one side of it.
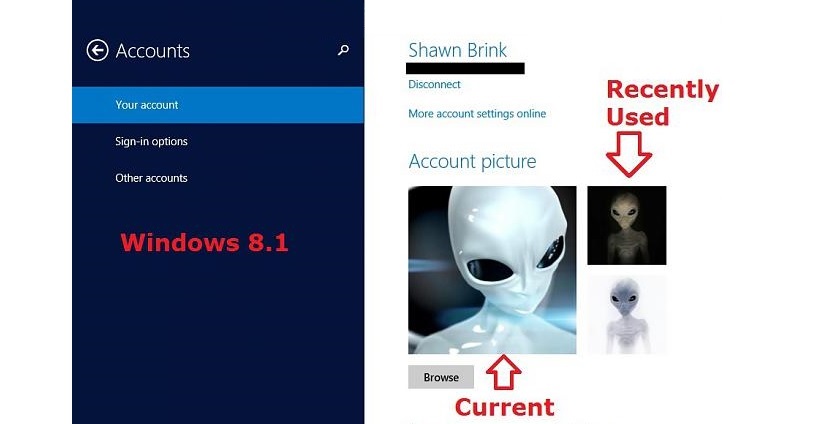
Windows 8.1 usually places by default the five images that we have used previously, this so that is recorded as a small history and thus, we have the opportunity to choose any of them if at a certain moment we wish.
How to remove these images so they don't appear anymore
Well, everything that we are seeing at this moment in terms of the images that we have used at a certain time for our profile in Windows 8.1 we can make disappear as if by magic but, from a different environment. To do this, we suggest you follow the following steps:
- We head to the Windows 8.1 desktop
- We open the File Explorer
- Now we navigate to the following location:
C:Users(user-name)AppDataRoamingMicrosoftWindowsAccountPictures

In the space that says «user-name»You will need to enter the username you currently use in Windows 8.1. You must also take into account that the place where you will have to go represents a hidden folder, which is why you must make them visible.
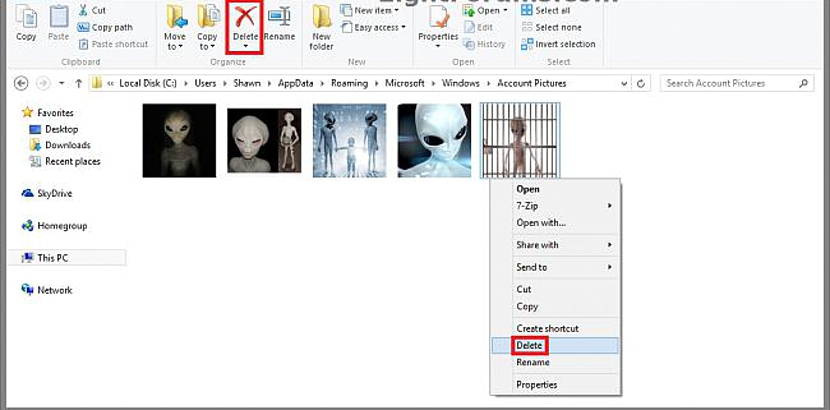
Once you have proceeded with what we previously advised, now you cans admire all those images that at a certain moment you could have used for your profile account in this operating system. You only have to select those that you no longer want to have and proceed to eliminate them immediately.
If you go back to the area where we were before, you will be able to admire that these images will no longer appear.
Thank you!!
Excellent. Practical, simple and effective. Thank you!
I don't understand why Windows doesn't offer this basic and necessary option.
It's very good, but I don't know how to delete the pictures the camera takes. I have been looking at it and it is not stored in the same place as the other images.
Thanks, I was all morning trying to delete some images and I couldn't heh, thank goodness there is internet for these queries
Thanks, easier to install (windows 10)
Thank you so much!
very useful. thanks. although in windows 10 it is more difficult to get to that location but basically it is the same: show hidden files, enter C: and then locate the microsoft folder, then windows and then account images
Thank you!
The truth is that I hate that windows does not let me manage my own PC as I please! LOL
Very simple and useful.Thank you
I leave the path for WIN10 - C: \ Users \ UserName \ AppData \ Roaming \ Microsoft \ Windows \ AccountPictures
Just change the UserName part to the username….
regards
Hello, I leave you the correction for windows 8.1 in Spanish is:
C: \ Users \ user \ AppData \ Roaming \ Microsoft \ Windows \ AccountPictures
then delete the photos that are in the folder and voila, good luck !!!