
The information that you are sharing with friends or with the general public can be very important enough for it to be plagiarized, which is why it is protected with copyright, although, if we want to go a little further in a very easy way we could try place a watermark on our Word documents.
From the version of Office 2010 onwards, Microsoft came to place a very interesting function to be used by all users of its office suite, same as under the identification of "Watermark" can be found directly in the "bottom of page" area; In this article we will teach you step by step to configure a watermark by placing an image or a text, all depending on the taste you have and prefer when using this function in your Word documents.
Preliminary steps when placing a watermark in Word documents
What we mentioned above could be one of the great advantages of using Office 2010, since the possibility of integrating a "watermark" it can be really interesting if we want the content of the information in the document not to be plagiarized at any time. Our previous steps before placing a specific "watermark" might suggest the following:
- We open or run Microsoft Word.
- We pay attention to the toolbar at the top.
- We go to the tab «Page design«.
- Now we head towards the area of «Page Background«.
- We click on the option in that area that says «watermark«.
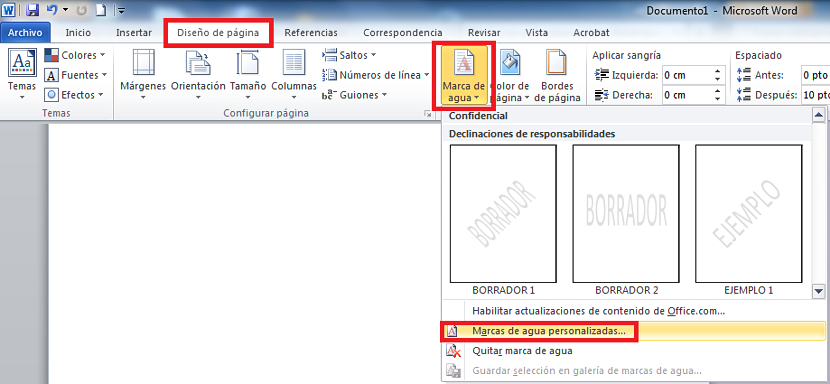
From the options shown we choose the one that appears in the final part, which refers to the selection of "Custom watermarks"; With this, we have already completed our first part of the procedure, being the ideal moment to choose what we are going to do from now on when placing them in our Word document.
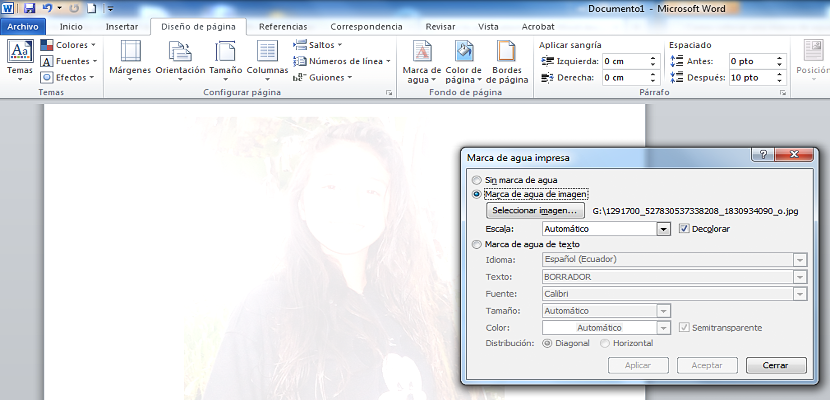
It is worth mentioning that if we are going to use an image as a watermark in our Word document, to it we must have previously processed it in any tool for said task; It is also worth mentioning as a trick or advice, that said image should have an elongated proportion in the vertical direction, since it will try to integrate along each page according to our document.
Once we have considered these little tips, what we should do is the following to try to place the watermark in our Word document:
- No watermark. We will choose this option only if we want to remove or remove the watermark that we may have previously put.
- Image watermark. By activating this box, the button that says "select image ..." will also be activated automatically, which when clicking it will show the file explorer so that we can select a specific image.
- Text watermark. This is the simplest part of all, since we only have to write in the "text" field the word that will be taken as a watermark in our Word document.
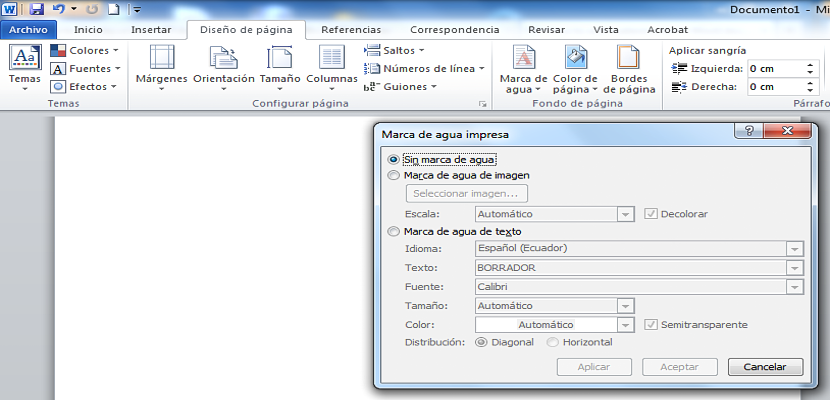
Regarding the watermark using an image, with this option we can also bleach it and use a scale according to our taste and style, although it is always advisable to leave it in the automatic size so that the image fits perfectly to the dimension of the format of the sheets that are part of the Word document.
On the other hand, if we have decided to choose the "Text watermark" here we will have the possibility of making it appear diagonally or horizontally. Here we can also handle the semi-transparency of the text, having to avoid making this parameter impossible to read all the information correctly.
Without a doubt, it is a very good option that we could be adopting when it comes to protect our files and documents, something that would be much better elaborated if after this information the we convert to a PDF with any free online application that exists on the web.