
Since Microsoft recently proposed its Windows 8.1 operating system, many people are reluctant to fully migrate from an earlier version due to their lack of experience in terms of working with them. professional applications on a completely new operating system.
For this reason, it is not strange to find a different number of these users with their respective personal computers working with 2 different versions of Windows; With a few tricks to follow, we will have the possibility of managing the startup of each of these operating systems, making it start first, the one we consider to be of "greatest importance".
The Windows Dual Boot with modern and classic interface
Let's suppose for a moment that you have Windows XP or Windows 7 working with each one of the applications that you have installed in those versions; There comes a certain moment in which due to an extreme need (because surely the application asks you to do so) you need to install a higher version, which suggests Windows 8.1; When you install this new version of Microsoft's operating system, the boot will be changed to what we currently know as a "DUAL Boot".

In the present case, the bootloader will adopt a "modern interface", something that differs immensely from the "classic" and which comes to be an aspect of form rather than substance. Under this working mode, every time you restart the computer, Windows 8.1 will be the one that starts in the first instance, which is because it was the last one that was installed and therefore, the one that generated this «boot loader modern".
If you change the order of the versions of the operating system on startup, this "modern interface" will be temporarily lost, giving way to the "classic" that we will surely have seen on different occasions.
Change the default Windows version of DUAL Boot
Well, once we have mentioned the respective antecedents and the possible consequences that you will encounter, now we are going to explain to you how you must act in order to change the boot order of operating system versions that you have on your personal computer, but assuming that one of them is Windows 8.1.
- Log in with any version of Windows (Windows XP, Windows 7 or Windows 8.1)
- If you are on Windows 8.1, head over to Desktop.
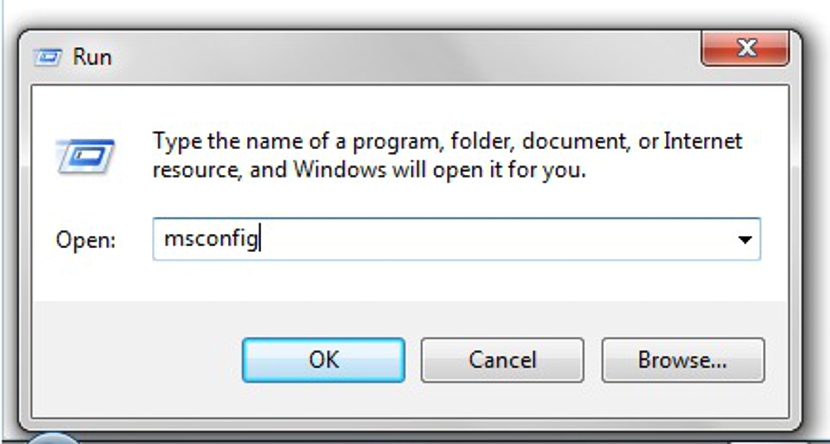
- You have used the keyboard shortcut: Win+R
- In the blank, write: «msconfig.exe»Without the quotation marks and then the Login.
- Now go to the «Boot«.
Once you are here, you will be able to see the 2 versions (or more if you have installed other Windows revisions) that are part of the Dual Boot, being fully identified the one that is considered as "default"; If you did not make any type of variation before, Windows 8.1 will be the default one. You just have to choose any other from the list and mark it as "default" and then apply and accept the changes so that the windows are closed and take effect on the next restart.
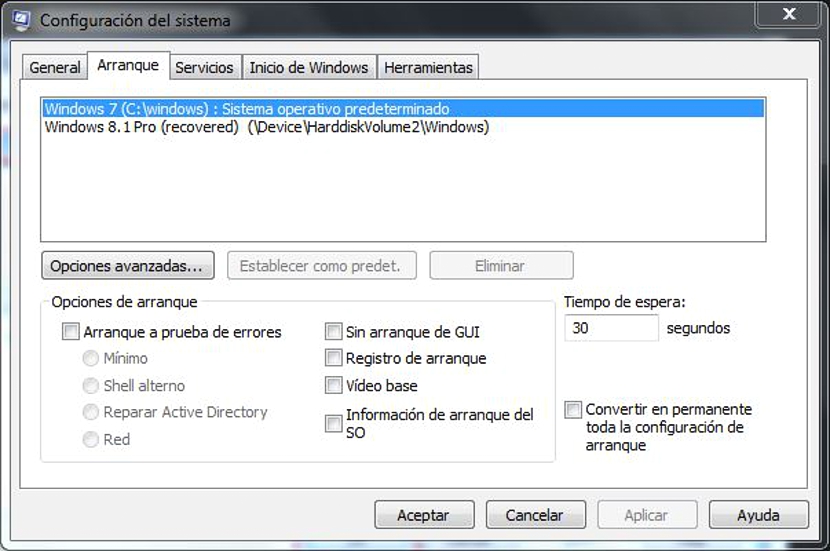
Assuming as an example that you decided to make Windows 7 the default, on the next restart you will no longer be able to see the "modern Dual Boot interface" but rather the classic one. There you will find a small timer of approximately 30 seconds, having to use the arrow keys (up or down) to select someone else that you want to start at that moment.
Windows startup timeout on Dual Boot
The window in which we get to configure a specific version of Windows as the default can be useful for many other tasks, which suggests eliminating some of them if we are sure that we are not going to use it in the future; in addition to that, in this same window you have the opportunity to define the waiting time when selecting one or another version of Windows (in the Dual Boot bootloader).
There are certain circumstances in which a user cannot change this data (the waiting time of 30 seconds), which can be due to different types of problems in Windows. If this should happen for some strange reason, we suggest that you follow this other procedure that also offers you the same possibility and objective:
- Start your version of Windows 7 or XP.
- You have used the keyboard shortcut: WIN + R
- In the empty space write: «sysdm.cpl»Without the quotation marks and then the Login.
- The «System properties«
- There you have to go to the tab "Advanced Options".
- Then you have to select «Configuration»From the area of «Start and recovery«.
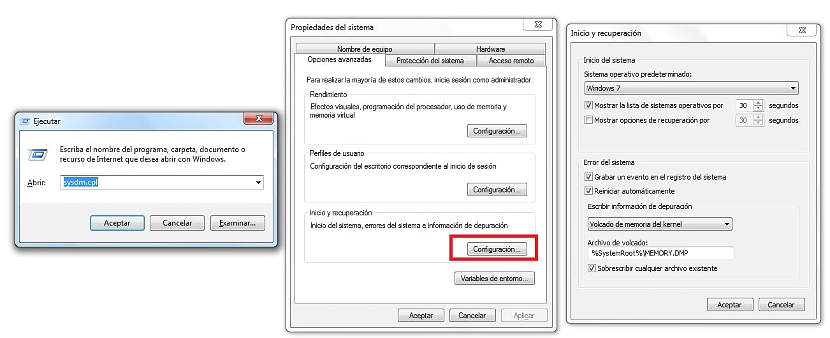
With these simple steps, now you will have the same information but with a completely different interface. There The operating systems that are part of the Dual Boot will be present in the bootloader though, with a little drop down arrow. From here you can also define the time to wait before the default operating system starts.
Now you have 2 good alternatives to manage the way any of the Windows versions that are part of your Dual Boot should start in the boot loader.