Hlong ago I promised that I would make a manual to learn how to use Sqirlz Morph. This program is used to do morphing, for those who do not know what this means I leave the following definition of morphing:
BWell now that you know what morphing is, if you want to know what Sqirlz Morph is capable of, you can watch the video shoeJoker made with this program.

COn Sqirlz Morph you will be able to make multiple transitions between several images, it is not limited to a source image and a final image, but you can add more intermediate images to make your transformations more fun. You can save the result as an AVI video file, as a GIF graphic, or in Macromedia Flash SWF format. You can also save the images one by one in JPEG or BMP (bitmap or bitmap) format. In addition, Sqirlz Morph is compatible with all windows from 95 to Vista and is completely free , without limitations or trial periods, we will really do morphing by the face (by the face).
BWell, if the video and the program's features have convinced you, let's see how to install Sqirlz Morph.
Ddownload the program from Softonic or visit the Sqirlz Morph official page. Right now the version is 1.4 and this tutorial is based on it.
CWhen you have the file on your hard drive, unzip it as it comes in ZIP format. Then double click on the executable file and follow the following sequence:
YYou have the program installed now we are going to see a general review of the Sqirlz Morph workspace.
PTo open the program follow the following path:
SThe following screen will open:

In this window we can differentiate five zones. The first one, as we can see in the image above, is the work area and occupies the central part of the screen.
Then we have the menu bar, at the top.
Just below the menu bar we have the general toolbar (Toolbar (General)).

To the left of the window is the Toolbar (Control Point).

The Status Bar appears at the bottom.
And finally, just above the status bar is the Toolbar (Frame Select).

We already have an overview of our workspace, now we will see how Sqirlz Morph is used.
EThis program is quite easy to use and now you will see it. To make a transformation, for example from one face to another face, we need the following:
- Two images: we are looking for two photographs, as in this example we will make a transformation from one face to another, we have to search for two images of faces. It is desirable that the photographs have some similarity in terms of colors and position of the faces. Let me explain, if the two photographs have similar background colors, the transition from one face to the other will be more harmonious, on the other hand, if we take two photos, one with a character in profile and the other with another character from the front, the transformation will not be so fluid. . That is why it is advisable to use two photos in which the characters present a similar framing, although it is not strictly necessary.
- Place control points: When we make a transformation we will have a source image and a destination image. You can also use multiple images or then reverse the direction of the transformation, the source image being the destination image and vice versa, but for now we are going to stay with the simplest option, which is a source image and a destination image. What we must do is place control points in the source image that mark the different parts of the character's face to be transformed. The more points we place, the more complex our morphing will be.
- Move the control points of the target image: As we place control points in the source image, these points appear in the destination image, but they rarely appear in the right place, so we must move them to make them coincide with the parts of the face that marked the points control of the source image. Now we will see in more detail that this has no difficulty.
BWell now that we know what we need let's start with the transformation by following the steps listed above:
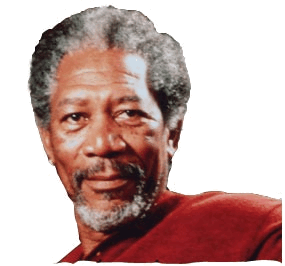
1º) We look for the two photos with which we are going to perform the morphing, for this you can take an image that you have taken with your camera or use Google images. I am going to perform a simple transformation between Kofi Annan y Morgan Freeman and I have chosen these two photographs to do the morphing.


Now we are going to import the two photographs into the program. Open the Sqirlz Morph and click on "File" in the menu bar. Then click on "Open" find the two images on your hard drive and select them. Finally click on «Open». The two selected images will appear in the program window, one above the other. Drag the target image to the right and leave the work area like this:

The image that appears in the center of the two faces is the «Preview» window in which you can see how the transformation will look as you add control points.
Before continuing we are going to save what we have done in a project, to do this, click on «File» and then on «Project» and «Save As». The "Save As" window will open in which you will have to give your project a name. Choose a name and click on «Save». From now on, whenever you make significant progress in your work, you should save them so that you do not lose the changes in the event of a power failure or simply when you want to stop working to continue later.
2º) If you have saved the project and closed the program to continue with the tutorial we have to open the project. Click on "File" in the menu bar and then on "Project" and "Open". The "Open" window will open in which you must search for the saved project. Once you have selected it, click on "Open" and we can continue where we left off.
3º) The transformation between the two faces can be done in both directions, as I want to do it with the photo on the left as the origin of the morphing, I will have to configure the program to do so. To do this, click on «Image» in the menu bar and then click on «Animation Order», the «Animation Image Order» window will appear.

The image that appears first in the list will be the source image of the transformation, in this case the image of Freeman appears and we will not make changes. If we had to change the order we would only have to select the Kofi image and click on the buttons on the left of the window to upload it.
4º) For the transformation to be successful, the two images must have the same size. To achieve this we can adjust the size of the images from the same program, we just have to select one of the two photographs by clicking on one of them and then clicking on "Image" in the menu bar, in the menu that opens click Click on "Equalize sizes" and a window will open in which it will ask you in English if you are sure you want to adjust the size of the other images to the size of the selected image. Click on "Yes" and all the images in the project will be the same size.

5º) Now we are going to modify another value of the program that by default is set to "20" and that is the number of frames that make up the transformation. To change it we will click on «Morph» in the menu bar and then on «Period». The «Animation Period» window will open in which we will set the value to 50. In this way, the transformation will have 48 intermediate frames between the source image and the final image.

After adjusting the value to 50, click on «OK» and look at the toolbar for frame selection has changed its value from 20 to 50.

The higher the number of frames, the slower the transformation. A value of 20 will produce an excessively fast transformation that will cause the transformation between the faces to be poorly appreciated, although depending on the circumstances you may want to lower this value.
BWell, after having configured the previous parameters, let us enter fully into the process of transforming the two faces.
1º) The first thing is to select the tool to add control points («Add control points») that is in the toolbar of control points and that is represented by a green cross. Once we have it selected, we will go to the source image (in this case, Freeman's) and begin to add control points in reference areas such as the eyes, nose, mouth, ears, etc.

Notice how control points have been placed on both the ears and the eyes, the chin, the mouth, the nose, the contour of the hair and some on the forehead. Now look at the points marked as 1, 2 and 3 and you will see how in the Kofi image a point has appeared for each control point added in the Freeman image, but these points of the target image do not exactly coincide with the marked areas in the source image.

2º) We must make each of the control points of the source image coincide with the same areas in the destination image, that is, if a control point marks the center of the pupil of Freeman's photo, what we must do is move the point corresponding in Kofi's photo. To do this we will select the tool to move the control points that is just below the green cross and that has an inclined black arrow as an icon. With the tool selected we will go to the destination image and move the points one by one until they are in the correct area. To know if you are moving the right point, note that every time you select one in the destination image, in the source image the point will appear surrounded by a circle.

Move all the points in the target image until the image looks like this:

As you can see, we have made the points of the eyes coincide so that they mark the pupils and the corner of the eye, the other points have also been moved until they coincide with the origin points. You should also note that as you add and correctly place more control points, the image in the «Preview» window changes, giving you an idea of how the morphing will be.

3º) Add as many control points as you think necessary and when you want to see the result click on the "Morph / Warp" button located on the general toolbar. The icon for this button is a yellow arrow pointing to your right. After clicking on the button you will see in the «Preview» window how the morphing is done. If you want to see how the transformation between Freeman and Kofi is looking, click here.
4º) When you are satisfied with your work, you must decide in which format you want to save the transformation. You can choose to save it as an animated gif, as a flash movie or as a video with an .avi extension, when you decide, click on the corresponding icon in the general toolbar.

Let's see how the animation creation process is depending on the chosen output format.
-

Save as flash: Click on the corresponding icon and a "Save As" window will open in which you will have to give your animation a name. When you have set it, click on "Save" and the file will be saved with the flash ".swf" extension, but first a window called "Flash Movie Parameters" will open in which you must choose a "Frame Rate" between 1 and 100, leave it at 15 and keep in mind that the higher this value, the faster the transformation will be. For example, our morphing has 50 frames, if we choose a frame rate of 25 the transformation will take place in 2 seconds. Leave "Auto Background Color" checked so that it automatically generates a background color if necessary and finally in the bar below you can choose the final quality of the images by moving the bar from right to left (higher to lower quality). The default value (60) offers an acceptable result and a lightweight file (it takes up a few megabytes). When you have everything configured, click on "OK" and the animation will begin to be created.

-
Save as avi: To save as a movie with an .avi extension, you just have to click on the corresponding icon. The "Save as" window will open, in which you must enter a name and then click on "Save". Then the "AVI Frame Rate" window will appear in which you must choose the number of images per second, leave it at 15, as in flash format, the higher this number, the greater the speed at which the conversion is carried out. Finally click on «OK» and the «Video compression» window will open. Here you will have to choose the video compressor you want to use and that will depend on the codecs that you have installed on your computer. A good choice would be to choose the "TechSmith Screen Capture Codec" as the compressor, which comes by default in the program and creates a lightweight file. When you have chosen it, click on "Accept" and the creation of your video will begin.

-
Save as GIF: If we want to save the transformation as an animated image file (GIF) we will click on the corresponding button and the «Save as» window will open. After giving a name to our transformation, we will click on «Save» and the «Frame Rate (GIF File)» window will appear, leave the default value (15) and click on «OK». The creation of the GIF file will begin.


Dfter having saved your work in any of the previous formats, you have your transformation finished. Now I recommend that you save your project, you know how, in case later you decide to add more control points to improve the transformation. What we have done is a simple transformation with few control points, but this program allows for truly spectacular transformations.
DI leave for a next more advanced tutorial some pending things like the transformation between more than two faces, the addition of frames at the beginning and end of the transformation, etc. If you are interested in the subject of Morphing, do not hesitate to visit the section with the same name here on the Vinagre Asesino blog. I hope this has been useful to you Sqirlz Morph step by step tutorial and do not hesitate to leave your comment. Vineyard greetings.
Hello Vinegar, thank you very much for this wonderful tutorial, I had wanted to learn how to use a morphing program for a long time and I thought it was more difficult. Hope you keep uploading more morphin stuff.
You're welcome Morpheus you see that morphing is not that difficult. Greetings.
Thank you very much for writing all this!
The truth is that it has clarified me a lot.
regards
You're welcome, sir. All the best.
seriously ... you saved me! I have k make a video for a graphic subject in which the drawings are transformed and I had no idea how to do it ...
thank you very much!
HELLO, I HAVE A DOUBT ABOUT THE TRANSITION OF MORE THAN 2 IMAGES, I AM NO LONGER ACHIEVING THE DESIRED EFFECT WITH MORE THAN TWO.
It's complicated. K DE KAY you have to place the points right from the beginning with the three images.
JUST THANK YOU VERY MUCH !!!
NOW LET'S GET TO WORK
Cool, this program was in my drawing book.
It may seem complicated, but once you get the hang of it, it's easy. Very useful for msn icons
SPECTACULAR!!! I comment that it is the first time that I read a tutorial on your website, I am from Argentina and honestly the tutorial seemed very, very good and above all very well detailed, (especially for clumsy) hehe ...
A cordial departure and simply: THANK YOU VERY MUCH !!! to all who apply ...
Lucas I'm glad you like it, welcome to Killer Vinegar.
Thanks for the info.
I have a problem… ..the speed with which the photos passes is excessive…. Is there a control to slow down that speed?
Incredible that there are people as cool as you… ..muxisisisisimas acias you are super cool !!!!
I just read this face transformation program.
I'm holding her hand
Have you published the promised 2nd part?
Thank you
PS: please tell Cari not to murder the language, it is written "good", not "wena", "thank you" and not "thank you", and the k and x have other purposes.
I hope that when she is already a woman she will realize the murder she is carrying out.
Buenos Aires, July 17, 2009.-
I have a problem: I am doing morphing with 3 images, I use a lot of points and the morphing looks very good but from the 1st to the 2nd image the transition is successful, after the 2nd it makes a reverse to the 1st to finally fall into the 3st image. XNUMXrd then it does not suit me very well if you can help me I will know how to thank you ... in advance thanks
Hello, I wanted to thank you for your tutorial, because it helped me better understand this morph technique. Right now I made one of my own, where I go out in a swimsuit and become another hunky guy.
Your tutorial a success
Thank you very much
Such a person is appreciated
Luck
Thank you vinegar, you have explained it very well, but I have some doubts, such as if I want to send it by mail ... in what format should I save it, "thank you" I don't know if you are going to answer it
thanks for the tutorial, I just need to know what type of file should I use to blog a Morph.
I keep reading….
Hello from now, thank you very much, your explanation very good and clear, but I have some doubts ... I already made a transformation with 4 photos and the wmm does not let me apply to the video I am doing I have saved it in avi format and I cannot see it in any program that I have. I would appreciate if you answer me, thanks in advance if you don't
Crazy, the explanations are very clear, it came out regal in one go !!!
now I don't know how I do it with many photos, is there a continuation ????
I answer Betty Boop ... I saved it as a gif and then I cut it and copied it in the mail and that's it ... as it is a gif you can only load it by copying and pasting but it comes out of ten !!! I hope it helps you ...
Where can I find what you say in the post ?:
«I leave for a future more advanced tutorial some pending things such as the transformation between more than two faces, the addition of frames at the beginning and end of the transformation, etc.»
P.S. The tutorial is great, I have followed it step by step and everything has come out perfect.
I wish you could tell me what are the steps to take instead of video photos. For the program to take a photo from one face to the other with each step. Thanks
Hello, thank you very much for the tutorial. I wanted to ask you a question, when I open the photos they come out with a 90 degree rotation and the option to rotate is disabled. I tried to save them also in the explorer with a 90 degree turn, but it still brings them upside down. What I can do?