
Have you ever heard anything about FFmpeg? Surely yes, although for many people this is one of the most complicated tools to use immediately; Incredible as it may seem, it offers us the opportunity to perform a large number of tasks in terms of audio and video management.
For example, How about having to merge 2 videos into one? o Extract the audio from some video file? Perhaps at this precise moment you will come to answer that for this, there are a few specialized applications such as Adobe Audition or any other that you know; unfortunately, if we do not have this professional application in its full version, we should look for alternatives that offer us a quick solution, perhaps FFmpeg being one of them and which we will discuss in this article.
1. Cut a video file to a smaller one with FFmpeg
In order to use FFmpeg in Windows (compatible with most) we will rely on a considerable amount of commands, which suggests, open a CMD terminal and, as far as possible, with Administrator rights; if we use the following sequence:

We will be defining that we want to have a video cut from a specific time. In the example presented, we have suggested that the video output.mp4 be created from 50 seconds and that its duration be 20 seconds.
2. Cut a video into multiple parts with FFmpeg
The image that we will place next represents the command and sentence to use in our terminal; there it is indicated, that we wish divide the video file into 2 parts, The first one being 50 seconds long while the rest would be the second part of the video cut from that time onwards.

The best of all is that the FFmpeg tool does not perform any type of compression, the resulting video having the same quality as the original.
3. Convert a video to a different format with FFmpeg
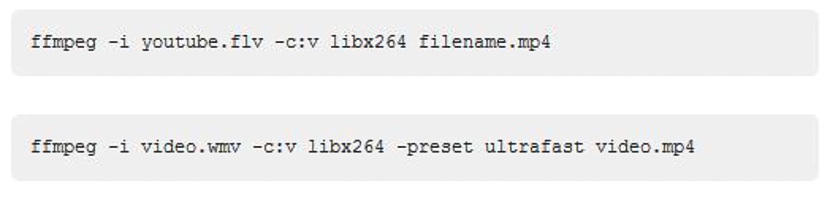
The image placed above is an example of what we could get with FFmpeg; There we have only defined the use of -vcodec (v) as an additional instruction, being able to convert easily and in a faster way to the one that can use a different application, a YouTube flv video to an mp4 one (only as an example).
4. Merge sequenced videos into one with ffmpeg only
Having mentioned the word "sequenced" we have tried to say that those that we will use to form part of one should only have one order in their numbering.

The command that we must use together with the sentences are shown in the previous image; one or more videos can be joined, as long as they have the same codec.
5. Remove audio from a specific video
If for some reason we don't want a video to have audio, then we could mute it.

We will only have to place a small instruction and parameter (as we suggested in the previous image) so that the resulting video no longer has any audio.
6. Extract audio from video with ffmpeg

The image placed above will help us to use the instruction correctly when wanting only the audio of a video; There we have defined the quality of the file in mp3 format, which represents 256 kbps.
7. Convert a video into a Gif animation
If you want to place a video on a web page, the ideal is that you previously convert it into a Gif animation because this format has a much lower weight than the original.

You only have to define parameters such as the duration time and the speed in fps.
8. Extract a single image from a video

To do this, we must know where the image is located, which we will define through the parameter using ffmpeg, something that is shown in the previous image.
9. Extract sequential images from a video (frames)

You will only need to define the resolution in pixels and the quality of the resulting images so that you can have all the frames that are part of a video, in one directory.
10. Mix an audio to a video file

If you are needing to place a small audio segment at the end of a video, then you could also do it with ffmpeg; An example of this we have placed in the previous images.
11. Resize a video

Using the parameter (-s) we will only have to define the new dimensions in pixels of the resulting video, as shown in the example in the image previously placed.
12. Create a video from multiple images

If you have a series of images, they should be numbered before being processed with ffmpeg; According to the previous image, you will have the possibility to make these images part of a video with a duration of 5 seconds.
13. Add an image to an audio file

If you have an audio file and you want to place a simple image at the same, you can go to the example previously placed; The image.jpg parameter represents the image that will be attached to the video, a procedure that can be useful if you want to share it on YouTube.
14. Convert a simple image into a video

An alternative to what we mentioned above is this; If we have an image, it by itself cannot be uploaded to YouTube (as an example), therefore it is necessary to convert it into a video using the sentence previously placed.
15. Add subtitles to an audio file

This is an interesting option that we could be rescuing from all the previous ones; If you have obtained the titles on the Internet for a specific movie, just follow the example above so that the file (in srt format) is pasted to the video as subtitles.
16. Cut with an audio file

In the example that we have placed above, it is mentioned that we want an audio file with a duration of 30 seconds, starting at 90 seconds.
17. Change the audio volume

This comes to be an alternative to the normalization of the audio; If you have one of these files with the volume too low, then you could go to the example that we have placed previously so that the audio is usually much better (and higher or lower according to each need).
18. Rotate to video

You may be wondering For what reason would you want to rotate to a video file? This utility can serve those people who have recorded a video on their mobile phones. The example suggested above mentions a 90 ° clockwise rotation (1), although if you want the rotation to be to the opposite side you must use the other parameter (2).
19. Increase or decrease the speed of a video

In the example (image) placed above we have defined 8x (1/8) as an increase in speed, although if we want to reduce the speed we should use the 4 * PTS instruction, which means that the video will be 4 times slower .
20. Increase or decrease the speed of an audio
What we did previously with the video file we could also do with an audio file, although in this case only values between 0,5 to 2,0 can be used to decrease or increase the speed of the audio file.

With all these helps that we have mentioned about the ffmpeg tool, we could get to run a large number of operations that directly involve modifying both audio and video files, all without having changed the quality and even without performing a bit recompression.
sounds interesting.
Too bad that for users we do not see it is exclusive, only images in the instructions.
the screen reader only says image 01, 02 and so on.