
YYou know how easy it can be for them to copy & paste the articles we publish. The same thing happens with the images and it also has the addition that when you find an image on a page You have no idea if it was created by the site's author or if it was copied from elsewhere. To avoid this, it is best to add a watermark to our images and at least we will have the possibility to claim the references when we see the images published on another blog or site.
Por that, and to premiere the series of posts related to Tools I use the most as a blogger, today we are going to see how to insert a watermark in an image in this step-by-step manual.
PTo add the watermark we have to differentiate Two phases: la creation of the watermark and insertion of the brand in the images that we select. Let's start with creating the watermark (watermark in English).
- Creation of a Watermark -

NWe will need image editing software. You can use Photoshop o Gimpbut it's worth it any program that allows you to create an image with a transparent background. In other words, any program that lets you create or manipulate images with a GIF or PNG extension will suffice. I recommend the latter for this task and I will continue the tutorial using a PNG image.
1º) Open your image editor and create an image with transparent background 380 pixels wide by 220 pixels high and with a resolution of 300 dpi (pixel / inch or pixel per inch).
2º) Now we can choose to watermark an image, text or a combination of both. My recommendation is that you use text because it contaminates the photo less (it looks cleaner) and it is easier to identify the url of the image author (so it will be easier for them to visit you without seeing an image of you there). I'll follow the tutorial adding only text, but the process is the same if you decide to include an image as a watermark.
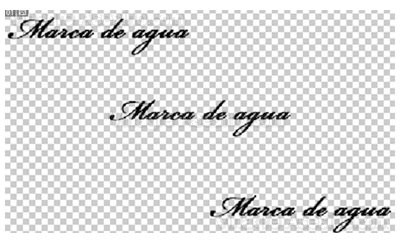
3º) Choose white (#ffffff) as color for text and write, for example, the url of your blog three times as in the image below. Keep in mind that in this image I have put the color of the text in black so that you can appreciate the text well, but you must use the white color.
4º) You only have left save the created image in PNG format. Remember that if you try to save it in JPG format, the transparent background will become white and will no longer be used for what we want to do.
Y in this way we will have our watermark created. Now we need to use a program to insert it into the images.
- Inserting the Watermark -
PTo insert the watermark we will use free software FastStone Photo Resizer that allows you to multitask with your images, from converting between formats even change the size of your images or rename them in bulk. And all this for free.

Pto download FastStone Photo Resizer you can choose to do it from Softonic or from the FastStone official page. Currently the latest version is 2.4 and it is the one that I will use for the tutorial.
Chen you have downloaded the program, double click on the file (called "FSResizerSetup24.exe") and install it. The installation process is extremely simple, you will only have to click several times on «Next>» and little else. When you have it installed, click on the shortcut that is created on your desktop to open the program and we can start the process of insert our watermark.
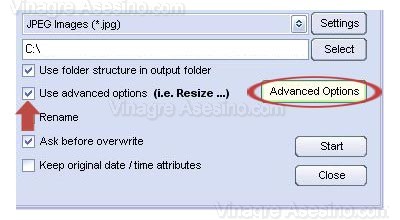
1º) The first thing is to check the box "Use advanced options" («Use advanced options») and then click on the button "Advanced Options" ("Advanced Options").
2º) In the window that opens you must select the last tab where it says "Watermark". Then you must check the box "Use Watermark" ("Use watermark") and then you must click on "Watermark Image" ("Watermark Image") to search the hard disk for the watermark that we created in the previous step.

3º) The watermark will appear in the center of the screen. Now you must test the values of transparency ("Transparency") that you want to give to the watermark as well as some effects like "Shadow" ("Shadow") that adds a shadow to the brand, "Background" ("Background") that mitigates the impact of the watermark by placing it behind images "Round" ("Round") that the truth is that I have no idea what it is for 😉. I have all these boxes checked and a value 7 for transparency. In this way, a good balance is achieved between leaving our mark on the image and maintaining its clarity. You can do several tests until you are satisfied with your watermark. When you're done click on «OK».
4º) Now we are back on the main screen, we only have to choose the images to which we want to add the watermark and start the process but before continuing you must take into account something important.
Having this clear, look for the images you want to modify using the area marked 1 in the following image. Then click on "Add" or "Add all" to add the images one by one or all at once. The images to be manipulated will appear in the area marked 2. Then choose the output folder ("Output folder") and finally click on «Start» ("Start") to start the process.

Y ready you have your images with your watermark inserted. FastStone Photo Resizer You have many other options that we will see in other manuals, for now I hope this one has helped you. Vinegary greetings.
as soon as the next one comes out I will edit all my images and put them with the watermark ... thank you very much 🙂
Hello… if you allow me, I'll leave you this link picmarkr.com/index.php (without www because layers send me to spamm)
I use that ... it's easy and fast 🙂
regards
Thanks for the simple tutorial 🙂
And the one in the comment above is also a good option, more for some who like to do everything online, like me 😀
All the best
Interesting, yes sir 😉
If I ever stop copy & paste I'll use the = P watermark
It is always good to know how to do it!
Kisses!
Javi, check the comments of the old posts.
The names have remained with the link to a page that does not exist. Maybe it's a migration problem. It is not because of the links themselves, which have no follow, but because it may bring you a problem of errors in search engines.
Greetings.
Neri thanks for the contribution and Mariano is already fixed, thank you very much for the tip. Greetings to all.
Hey Vinegar !!! Very currado this manual, look at you with the pile of images of manuals that I publish this had never occurred to me. Thanks man !
You're welcome forat. I highly recommend that you put the marks to your images, it is done in a moment and I think it is really useful.
excellent idea, download all the images by ftp, apply the watermark to them and upload them again XD
nymphetamine you were scandalized by the images 😉
jus ... I would like to learn from photoshop ... I suppose knowing how to do PNG, the rest should be easier ... let's see if after exams ...
I have followed all the steps to insert the watermark and the images have been created but for example the digimarc of photoshop says that it does not have watermarks. As we read them later Vinegar, excuse me, it will surely be nonsense maybe, greetings,
Angel
I have a query if someone has more knowledge about
FastStone Photo Resizer I would like you to give me a hand. My question is if the quality of my images with this software can be returned to the original size in it, if someone has a tutorial, I would appreciate if you publish it.
Flavia
Thank you:
Your info was useful to me
regards
Very good tutorial, simple and exact, congratulations.
man I admire looking for a long time to be able to do that, since it hardly starts with photoshop and I did many photos for my friends but seeing they said they did so, well, I looked for a way to put a watermark on it and I have how 500 and 1 x 1 is somewhat boring but with this it is very easy a million thanks
Thank you very much, it has been very useful
Hey there..
And what about images that have a clear predominance ... that is, there is not much contrast with the watermark? How do you solve it? or do you have to play with transparency in each photo?
Thank you.