
When we have files that we are no longer going to need in our daily work, we generally select all of them to later delete them; This elimination is partial, since in order for all these files to disappear from our view, we should right-click the Recycle Bin in Windows and later, prepare to empty it.
And we have mentioned, that the elimination is partial due to 2 important aspects; one of them refers to the second step that we should do and that we mentioned in the last lines of the previous paragraph; the other aspect instead is linked to the recovery of deleted files from our hard drives, having to use any specialized tool (such as Recuva) to retrieve them in Windows. But Is there a way to bypass the step of Emptying the Recycle Bin with the right button of our mouse?
First method to empty the recycle bin in Windows
We have referred to this task of Empty the Recycle Bin in Windows but, trying to bypass the secondary step, that is, the one in which we must click with the right button of our mouse and then choose this operation from the contextual menu. A first procedure that we could adopt so that the elimination of these files is direct, is the following:
- We look for the files we want to delete by browsing the different folders or opening our File Explorer in Windows.
- Now we select one or more files to delete (with the Shist or CTRL key).
- We click with the right button of our mouse to bring up the full context menu.
- At this time we must hold down the Shift key.
- Now we click on the option "Delete" while continuing to release the Shift key.
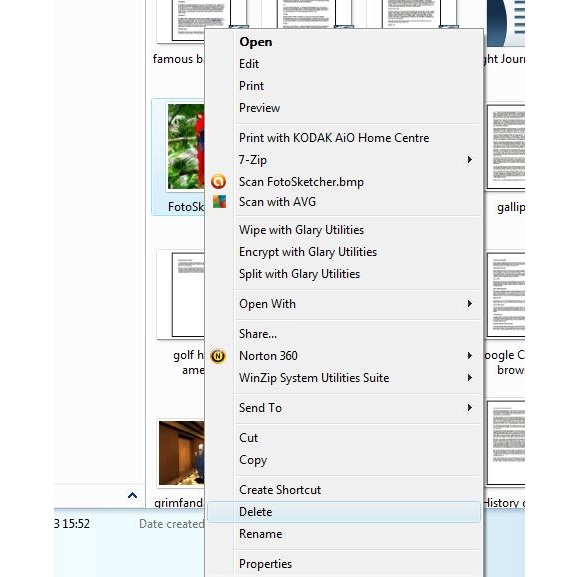
With these simple steps that we have indicated, a notification window will immediately appear, in which we are asked if we are sure we want to delete the selected files permanently.
If we answer affirmatively to what Windows asks us in that window, then the selected files will be removed from the location where they were. When minimizing the windows to admire the Recycle Bin, we can see that it is shown empty. If we enter into said environment, we will check such a situation, that is, that no element has been reserved there, therefore, this is a good method to be able to skip the option to Empty the Recycle Bin.
Second method to Empty the Recycle Bin in Windows
The previous method is one of the most effective to be able to implement at any time, when it comes to deleting our selected files, without having to subsequently empty the Recycle Bin in Windows. We will mention a second alternative at this time, where the user will have to carry out the conventional process at the time of delete all the files that you no longer want to have in Windows. To do this, we only need to configure our Recycle Bin as follows:
- We clean up our Windows desktop.
- We go to the place where the Recycling Bin is located.
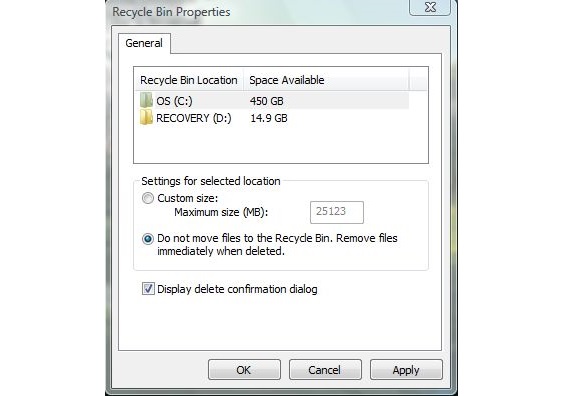
- We click with the right button of our mouse on the icon of the Recycle Bin.
- From the contextual options, we choose your Properties.
- In the General we select our hard drive C (corresponding system).
- We activate the option that says «do not move files to the recycle bin. Remove files immediately upon deletion. ".
- We click on Apply and then OK.
If we have continued with this second method, the user will only have to select all those files that they no longer wish to have on the hard drive and proceed to eliminate them in the conventional way as they have been doing so far; the elimination will take place effectively, which can be corroborated if we check both the icon and the inside of the Recycle Bin in Windows, managing to admire that the content is empty.
Any of the 2 methods that we have mentioned is valid when leaving the trash empty, although, if in our daily work we use a large number of files temporarily, It may be necessary for us to create a virtual space in our system so that all these files are temporarily housed there. If you do not know how to perform this operation, we recommend that you read the article where we create a virtual hard drive and subsequently, the proper way to configure the Internet browser so that the files are hosted in that space.
More information - How to proceed to recover deleted files with Recuva, Easy way to create a virtual disk in Windows, Strengthen the privacy of our data downloaded and hosted on the computer