The vast majority of users who buy a apple mobile device They start using it without having to connect it to iTunes the first time. As you know, already in the latest versions of iOS you can activate a device without the need to connect it to iTunes the first time, just as it used to be.
However, many people run into a big problem when, after having used the device for months, they have already learned how to use it and decide to go one step further, learning how to exchange files between the PC or Mac and the iPad, iPod Touch or iPhone. .
When you connect a mobile device to iTunes, if you have purchased content in the App Store and you had not connected the device the day you bought it, iTunes asks you if you really want to synchronize, because if so, it will erase all the content of the device and it will put what exists in the iTunes library where you are connecting it.
Before starting to fill the iDevices with content, we have to synchronize them for the first time on the computer that will be the base of our files. In order to have your device synchronized and that you do not have problems losing any files, we explain the steps to follow below:
- First of all we are going to make sure that we have installed the latest version of iTunes. To do this, on PC we download the apple page the latest version and on Mac we look for possible updates by entering the icon of the Mac App Store. The current version of iTunes is 11.0.5. In a few days, an update will skip since the new iOS 7 comes out.
- The next step will consist of give authorization to your computer to manage the iTunes library, that is, tell iTunes that it is you and that within the library you can save all the things you have downloaded with your Apple ID in addition to being able to synchronize all the devices that work under the same ID. To do this we have to go to the upper menu bar, click on "Store" and then "Give authorization to this computer ...". Likewise, in the same drop-down a little further down we are going to make sure that our Apple ID account is logged in, that is, that it is activated, otherwise we click "Connect ..." and enter our Apple ID.
- The next step is very simple, but before explaining it you have to know that in the latest versions of iTunes, the main window has changed and they have visually modified it to make it more attractive. So that you do not go crazy looking for the devices and have a more orderly vision, we advise you to go to the upper menu, click on "Display" and then in the dropdown click on "Show sidebar".
After these three simple steps, which for now have consisted of preparing the ground, we are going to what we are really interested in: synchronizing your iDevice to be able to exchange content between iTunes and the device.
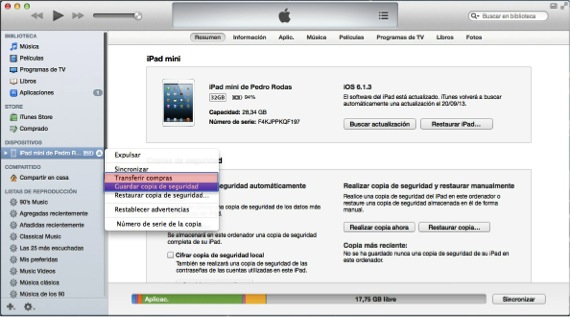
- Next we take, for example, the iPad and plug it into the computer with the lightning-USB cable that you use to charge it. You will see that it automatically appears in the left sidebar in the section "Devices" the name of your iPad. It is now when you have to be careful, because if you give it to synchronize, it will ask you the question we discussed before and if you accept it will erase all the content.
- The next step we have to do before synchronizing is to make a backup of the device in case a misfortune occurs and then transfer the purchases. It is clear that if you have activated the copy in iCloud, the device will already have a copy in the cloud, but sometimes we do not have it configured so that everything is copied as is because in the cloud we only have 5Gb free, so when the size If the copy is older, it will tell us that it cannot do it. To what we are going, to make the local backup click with the right button of the mouse on the name of your iPad in the previous left side window and a pop-up menu will appear that gives you that option and click on it. When the copy is finished, the next step is to transfer purchases so that if you have applications in which you have data, a copy of the application is made with the data within iTunes, in addition to the fact that the library will already know that those applications are yours because they have been downloaded with the same ID that you put in the authorization of the computer.
Once these two steps have been completed, we can now synchronize so that from now on, as soon as you connect the iPad, iTunes updates the library and gives you access to the iPad to exchange files.
More information - Twitter #Music has already arrived in Spain